Objectives
This guide mainly focuses on setting up 2 pfSense boxes where one is a master firewall while the other one is the slave firewall. High Availability (HA) in PFSense is generally having a redundant firewall set up as the backup whenever the current firewall (Master) is experiencing downtime via failover.
Prerequisites
- PfSense01.localdomain (Master) with 3 NICs – https://192.168.13.152/
- PfSense02.localdomain (Slave) with 3 NICs- https://192.168.13.175/
- Promox VE to create the VMs (VirtualBox does not support VLAN tagging)
Steps
Task 1: PfSync State and Settings Synchronization
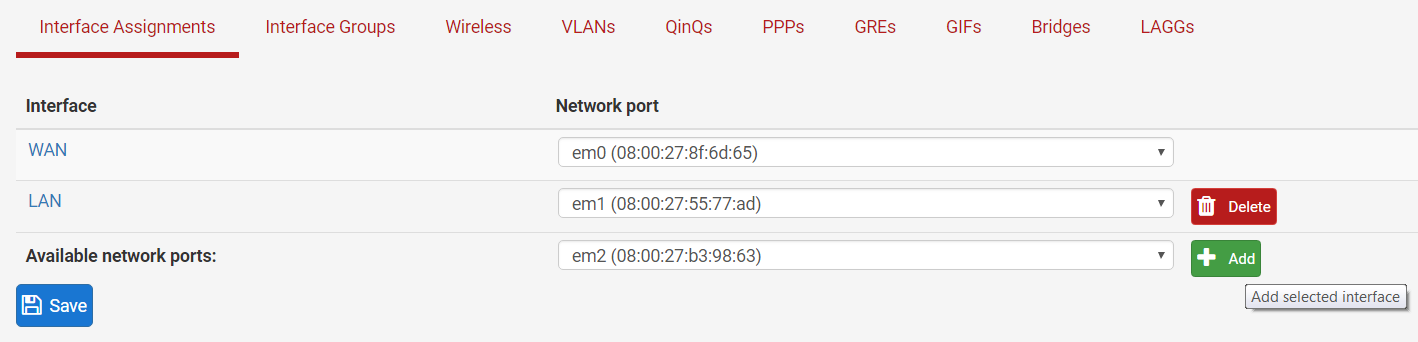
Step 1: On your master firewall, go to Interfaces > Interface Assignments.
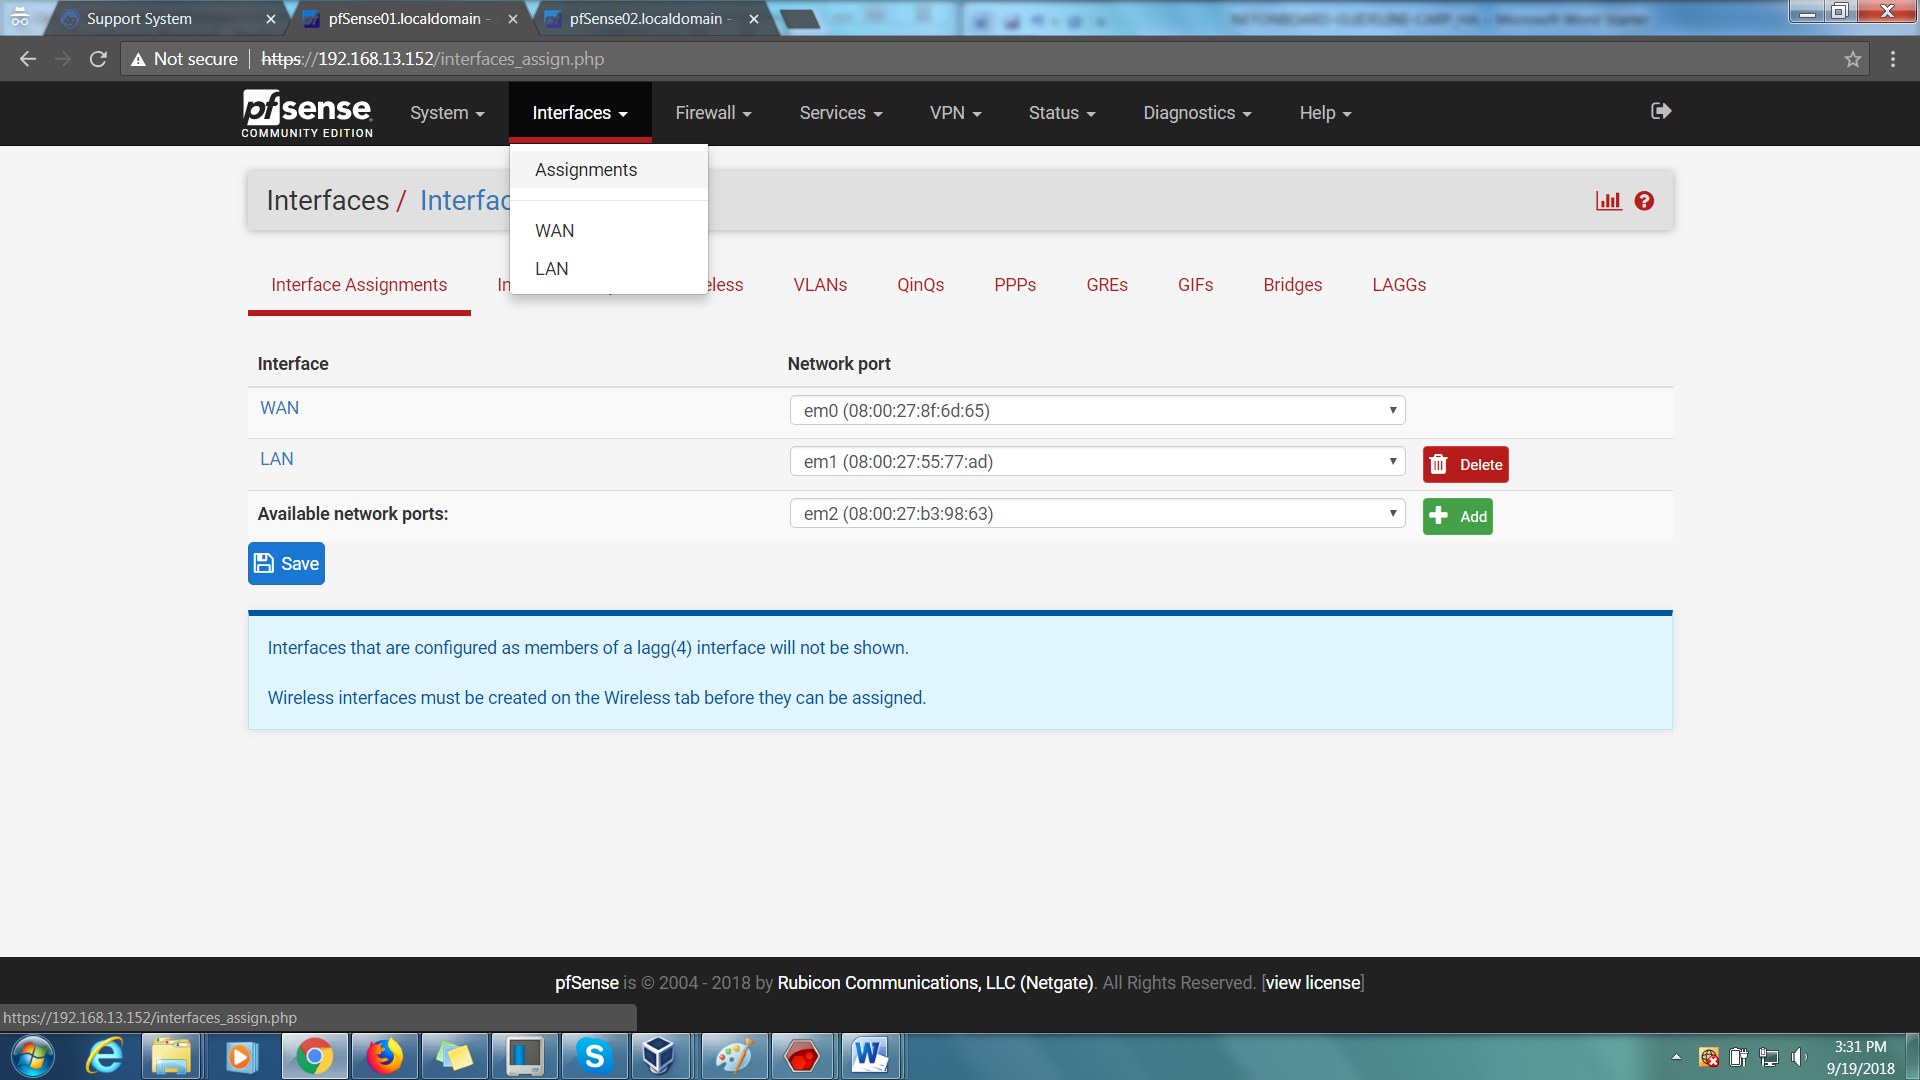
Step 2: Add a new network port. Make sure to have 3 network cards installed on the VM (WAN, LAN, OPT1).
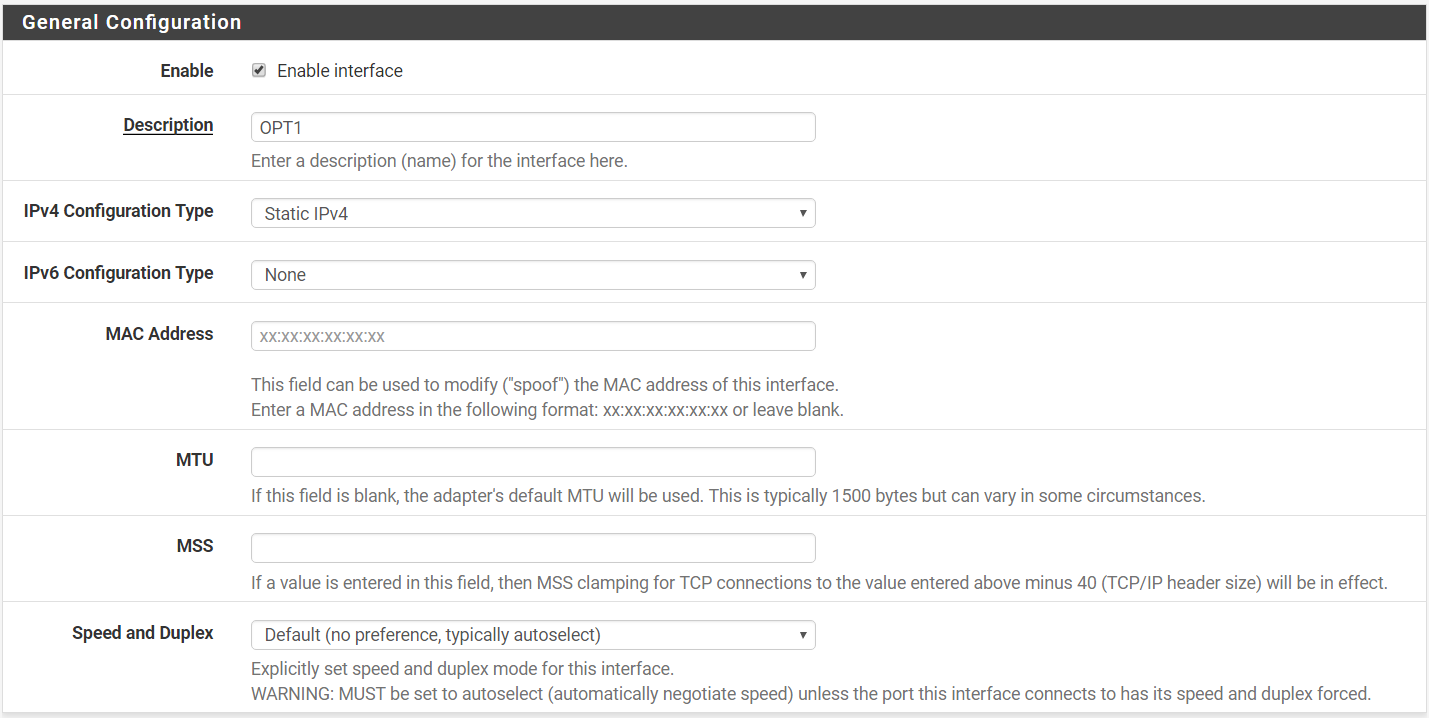
Step 3: Click on the interface (OPT1).
Step 4: Enable the interface.
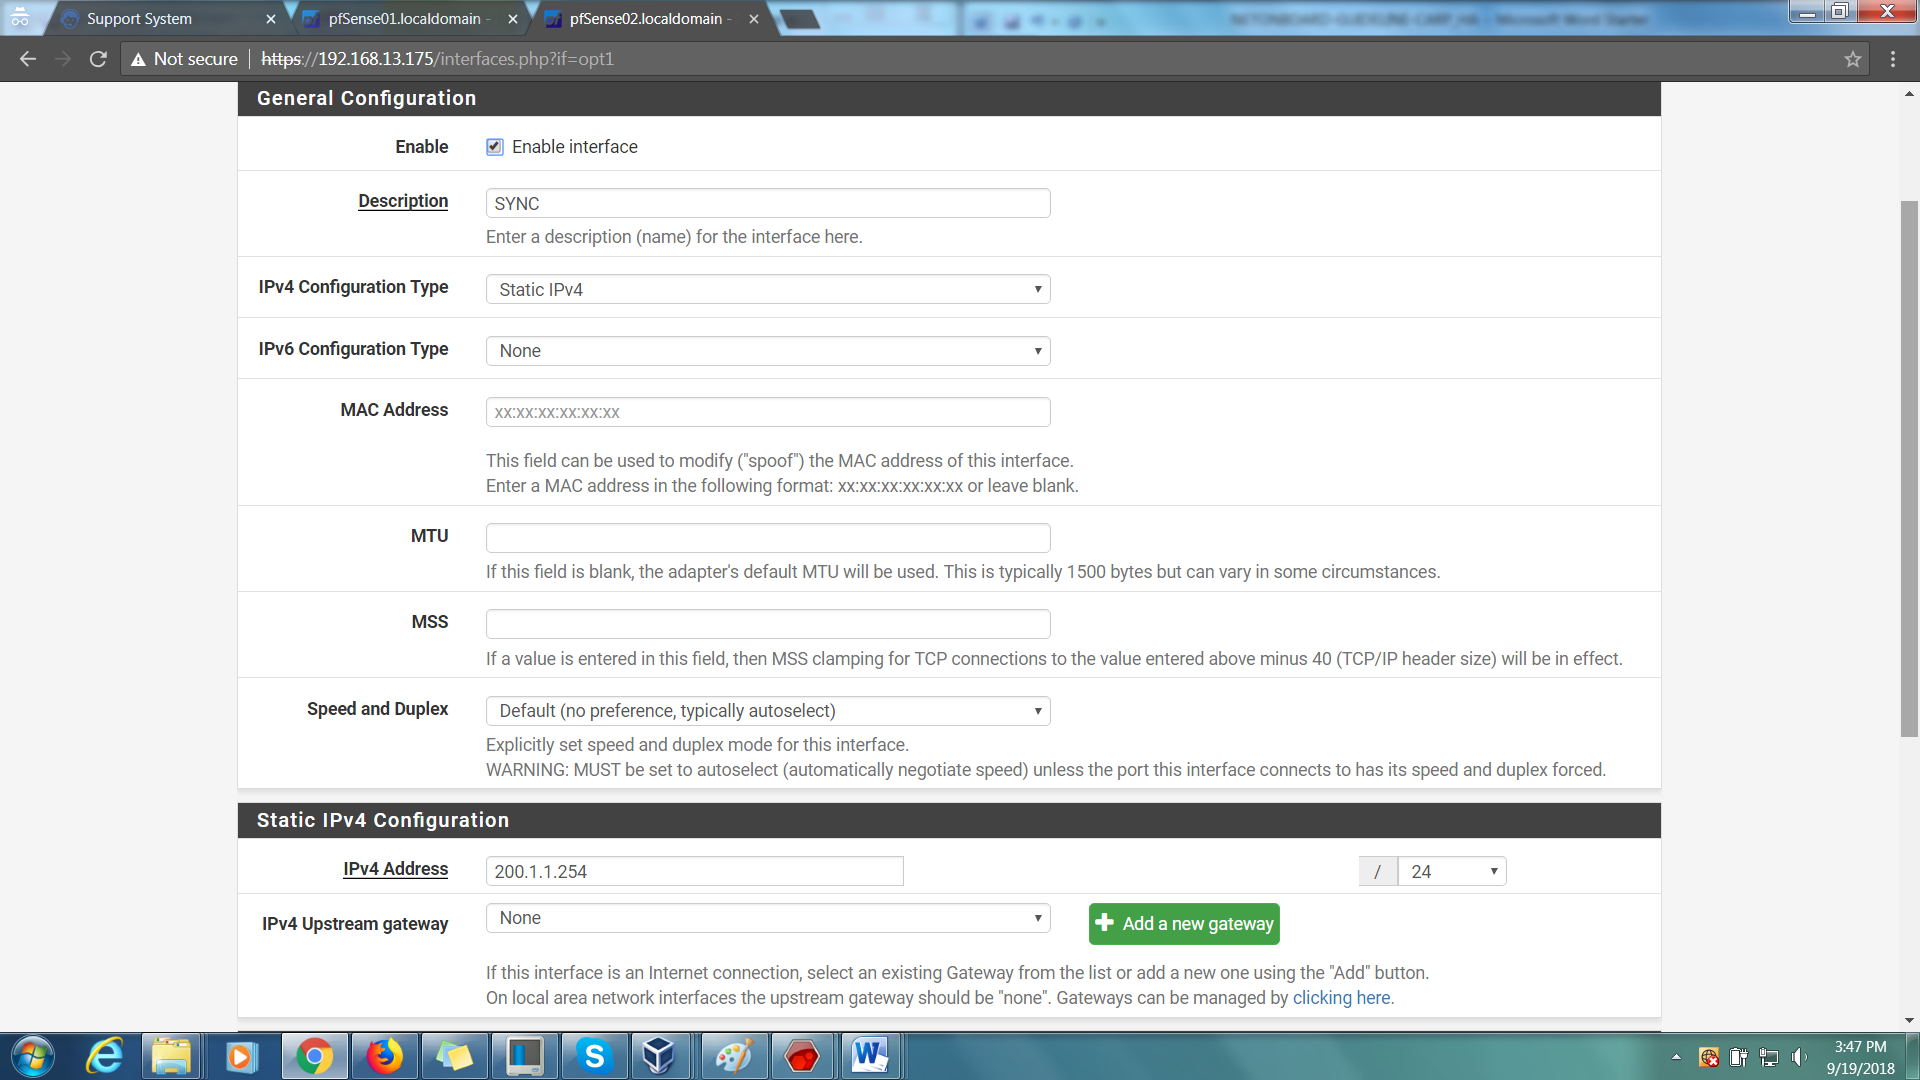
Step 5: Rename OPT1 to SYNC
Step 6: Change ‘Configuration Type’ to ‘Static IPv4’
Step 7: Assign a Static IP. In this case, we will be using 100.1.1.254 with subnet of 24.

Step 8: Save your settings and apply changes. Do the same for the other firewall but with a different static IP. For this case, we will be using 200.1.1.254/24.
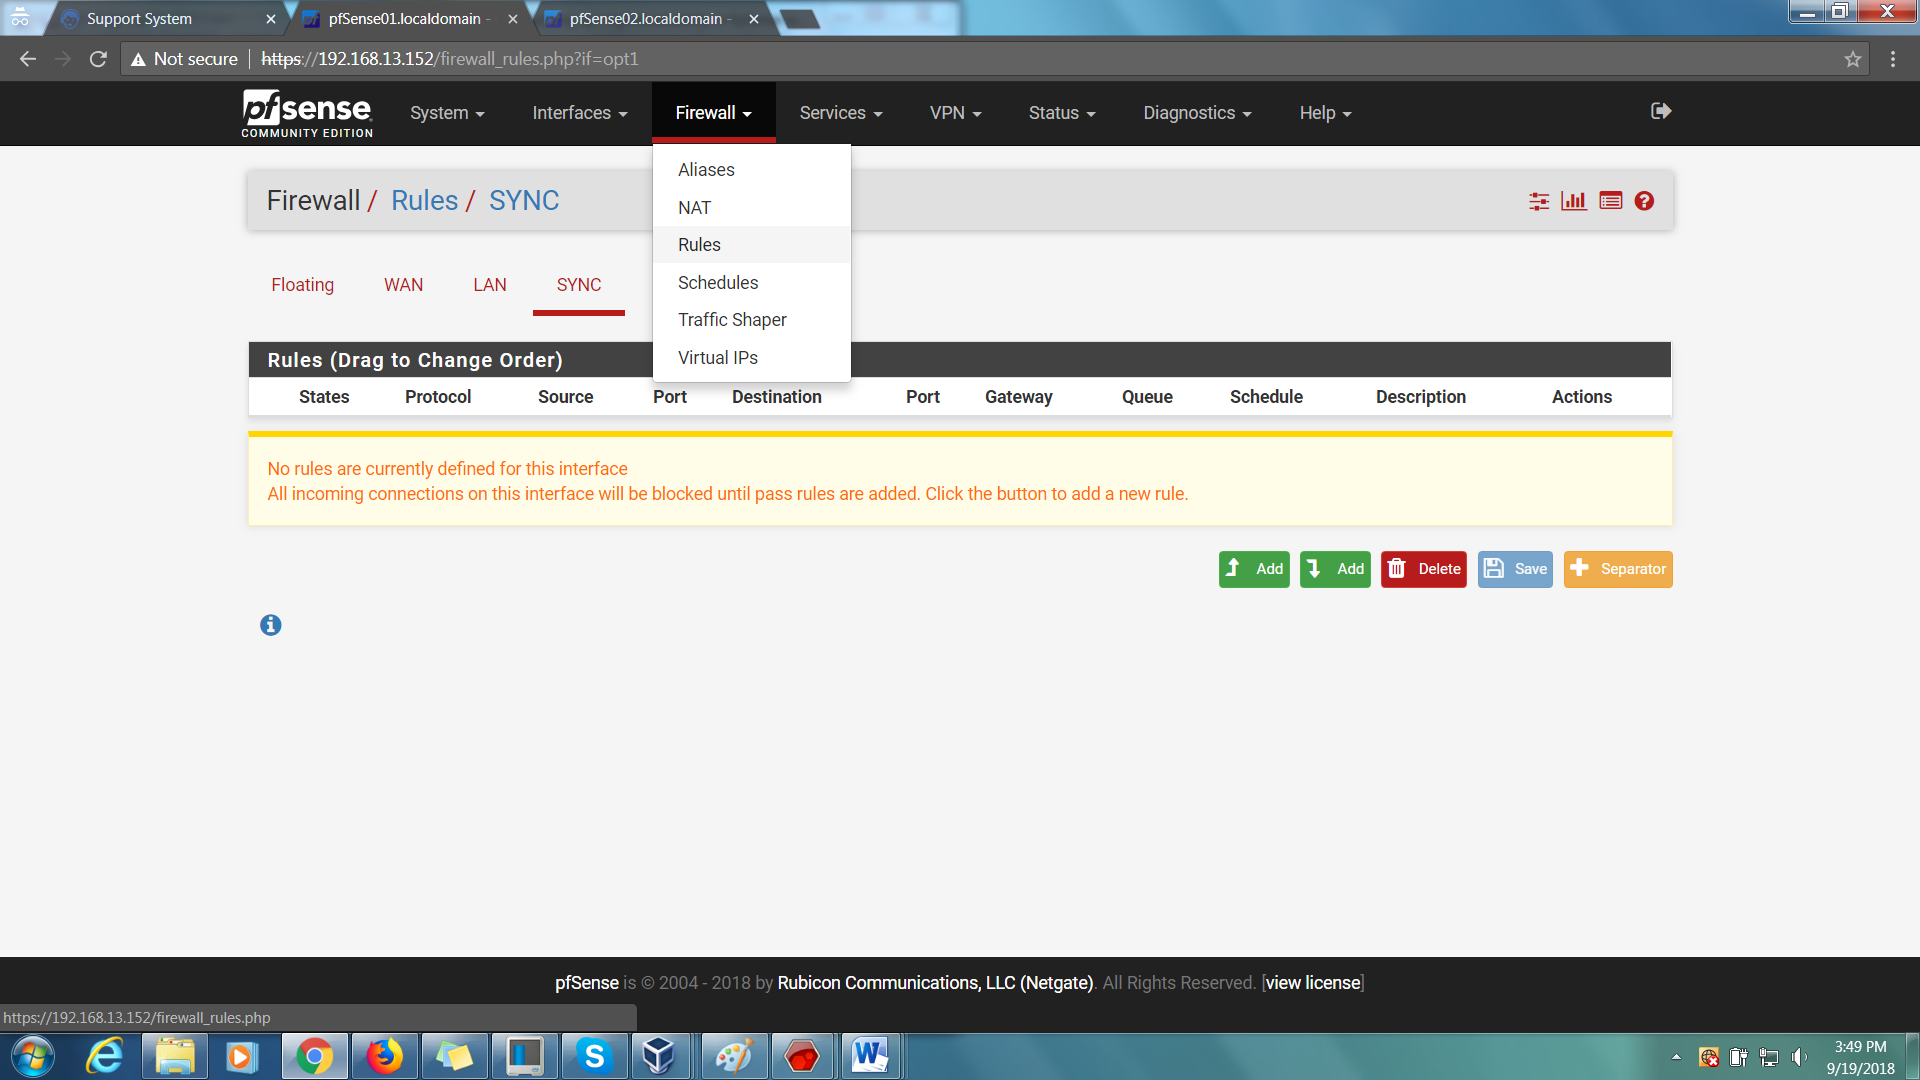
Step 9: On both firewalls, go to Firewall > Rules > Sync > Add and add 2 rules.
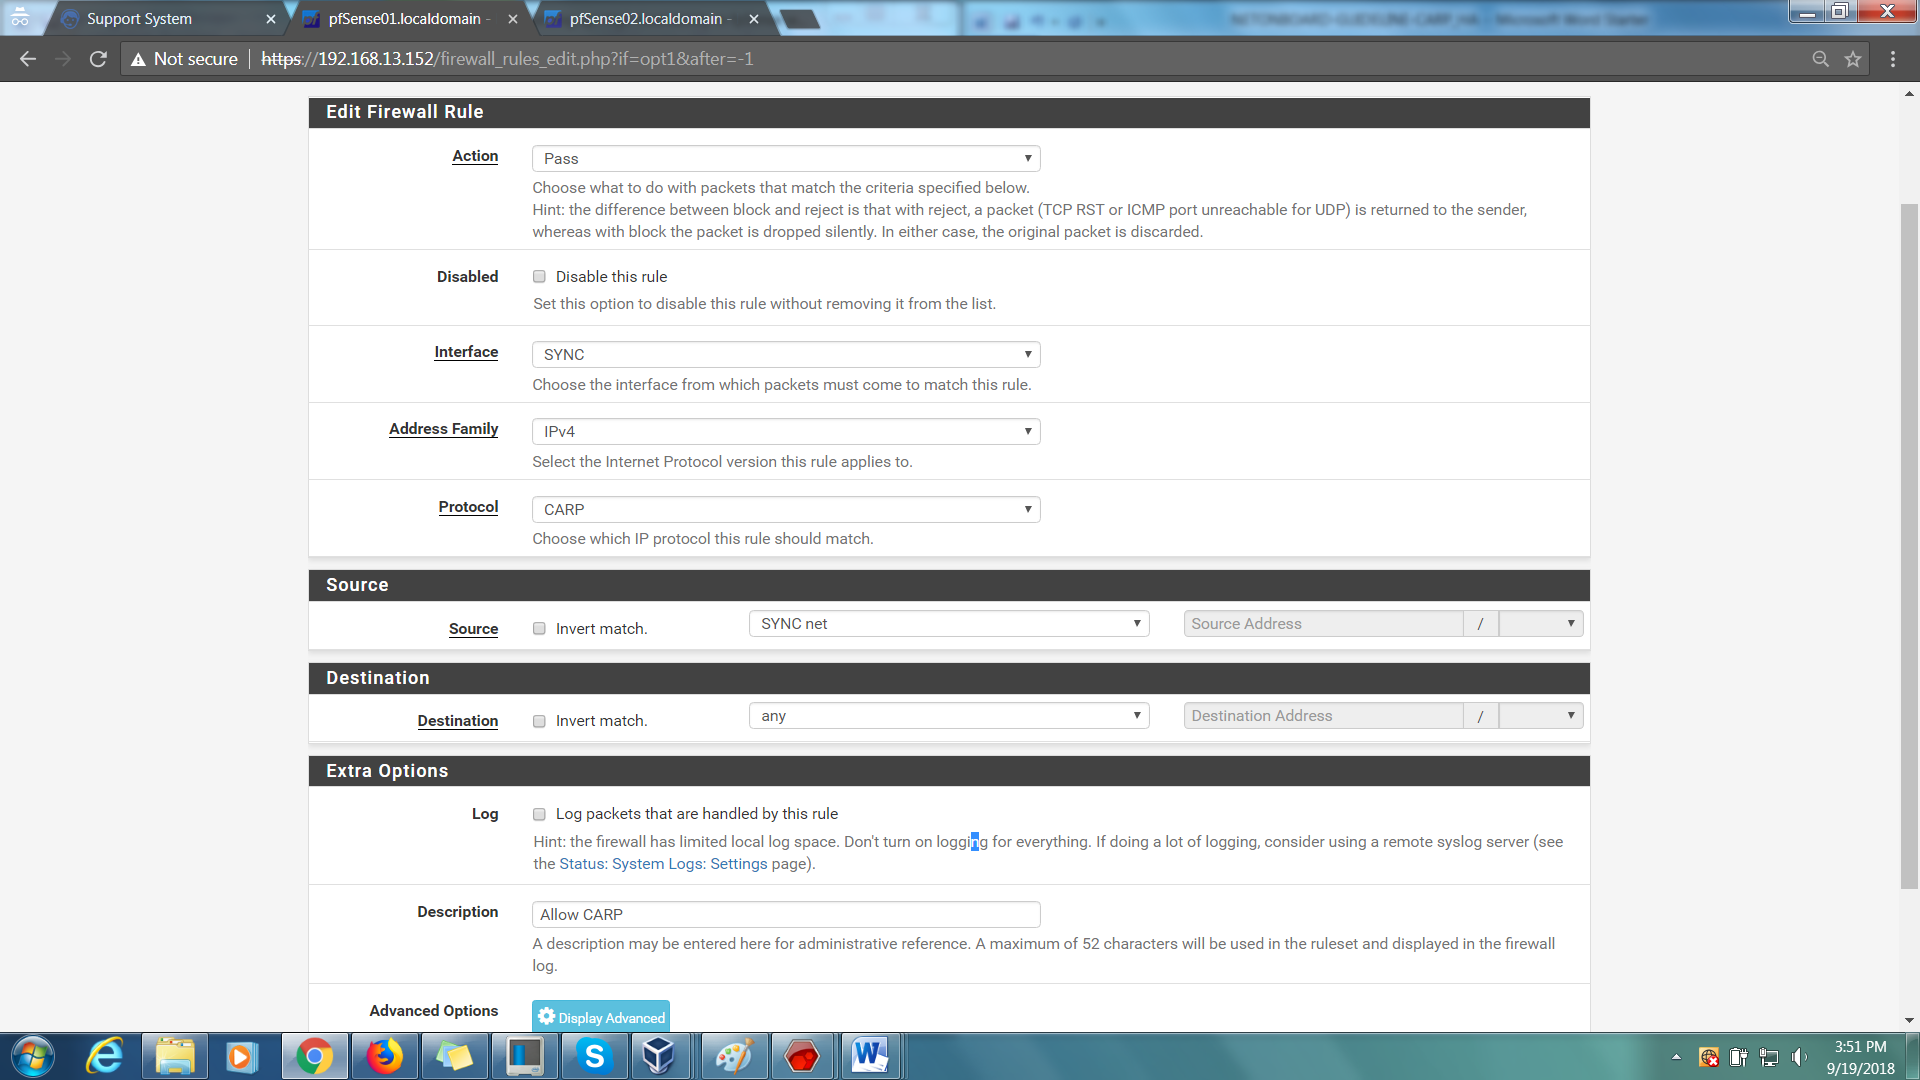
Step 10: 1st Rule:-
Action > Pass
Interface > SYNC
Address Family > IPv4
Protocol > CARP
Source > SYNC net
Destination > SYNC address
Description > Allow CARP (optional)
Finally, Save.
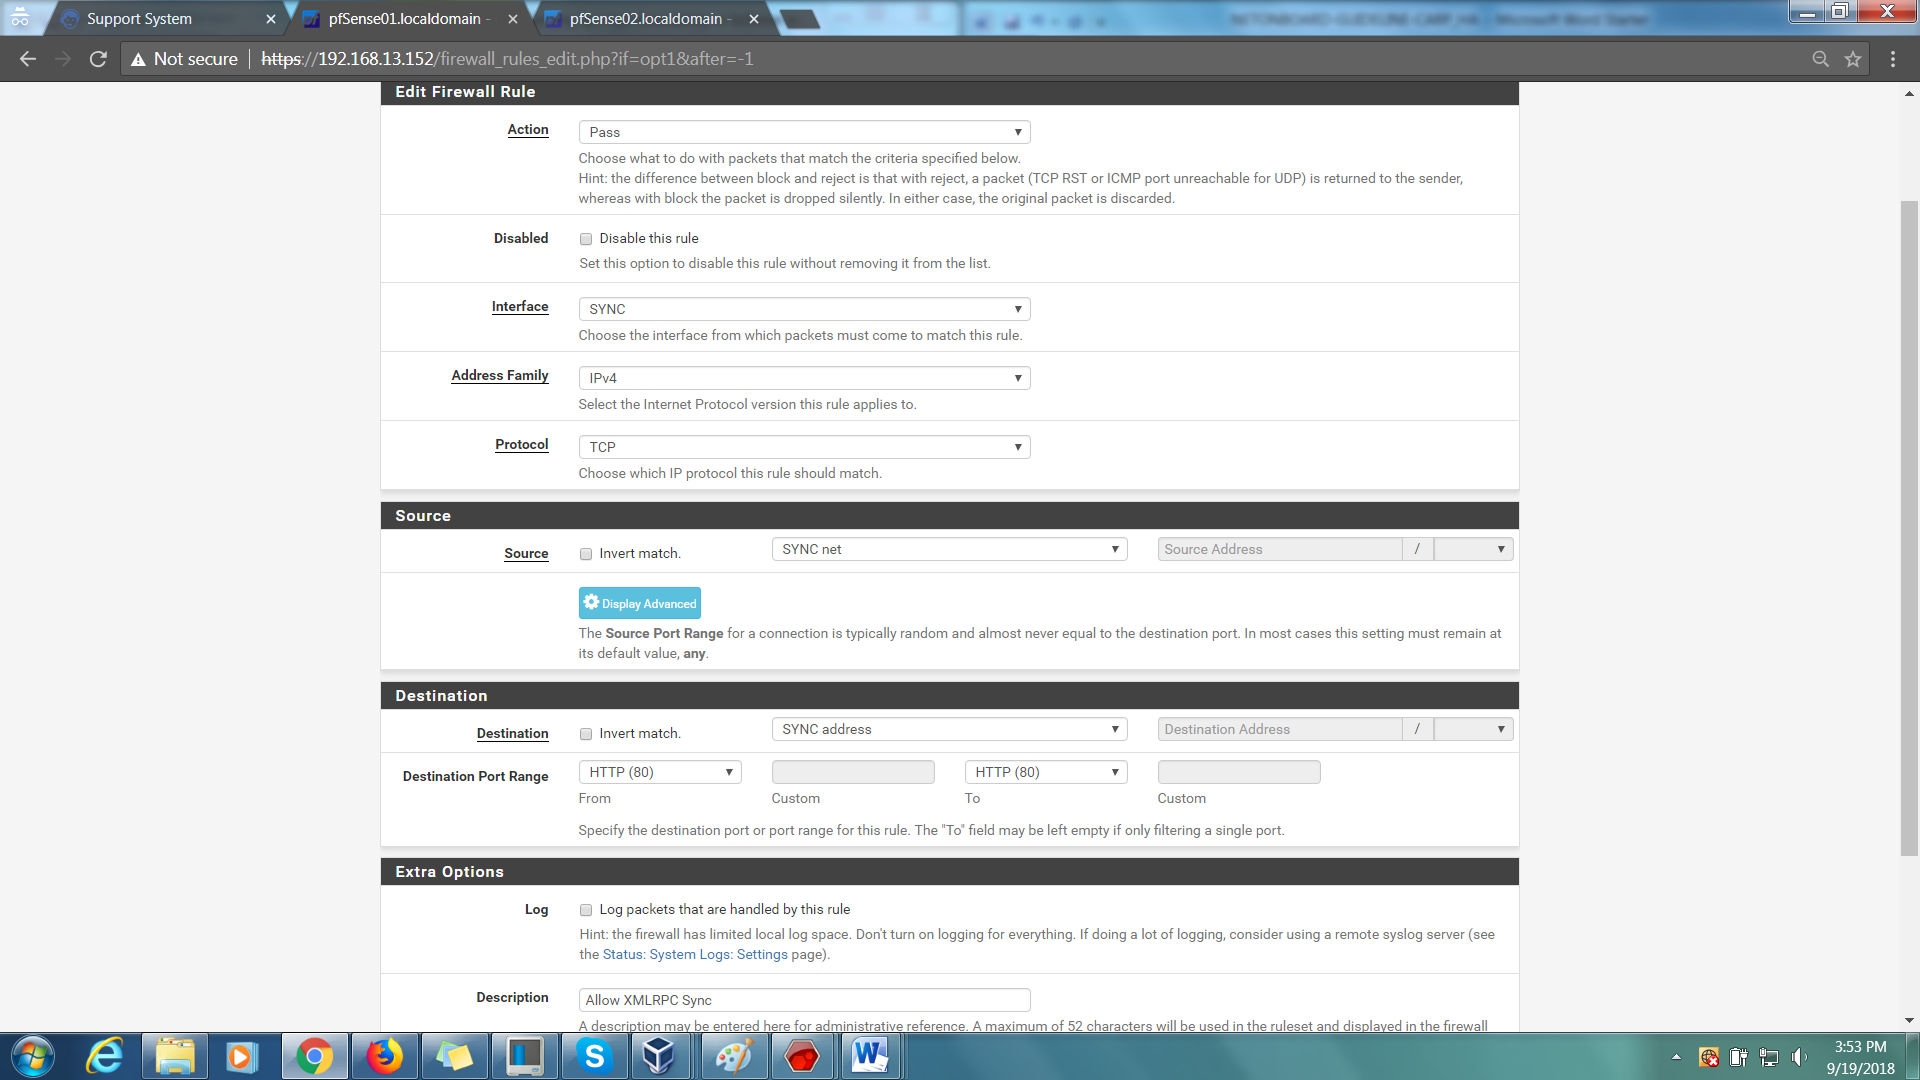
Step 11: 2nd Rule:-
Action > Pass
Interface > SYNC
Address Family > IPv4
Protocol > TCP
Source > SYNC net
Destination > SYNC address
Destination Port Range > 80
Description > Allow XMLRPC Sync (optional)
Finally, Save.
Step 12: On the Master firewall (pfSense01.localdomain), go to System > High Avail. Sync
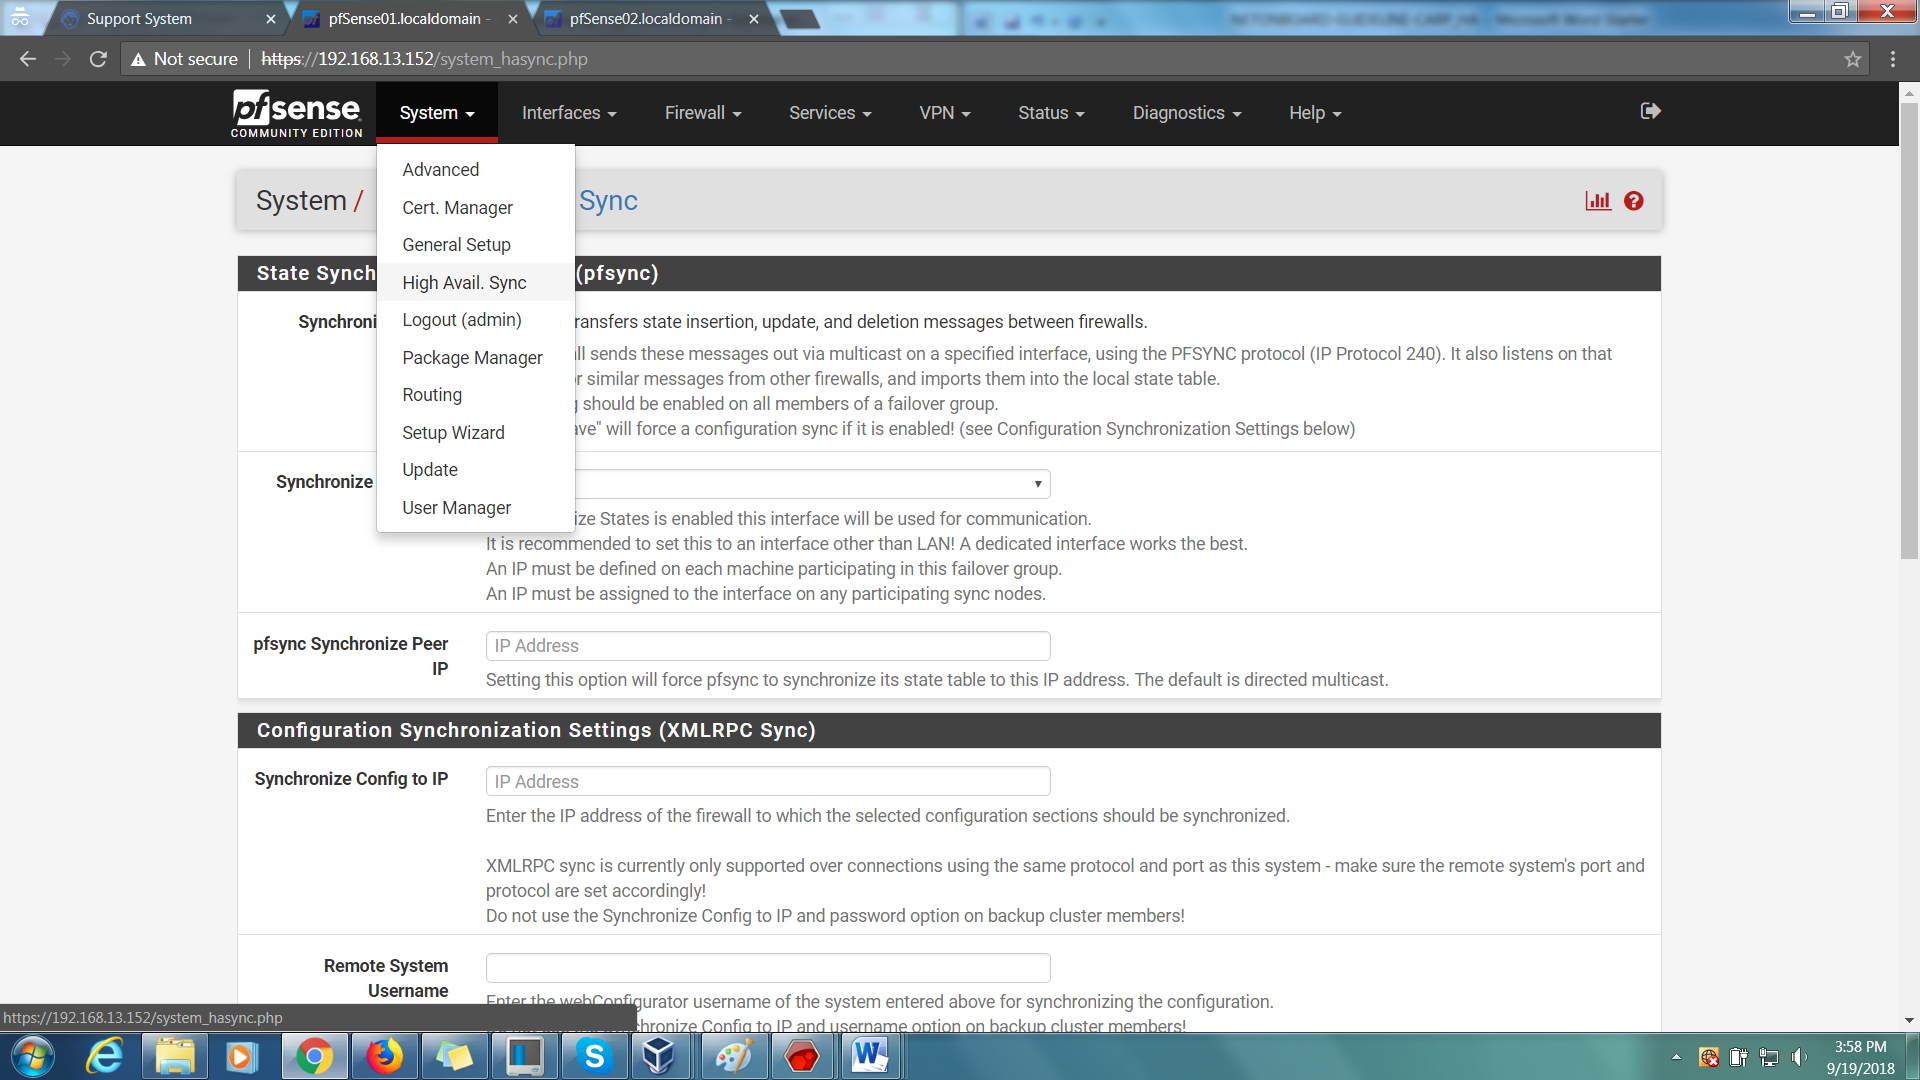
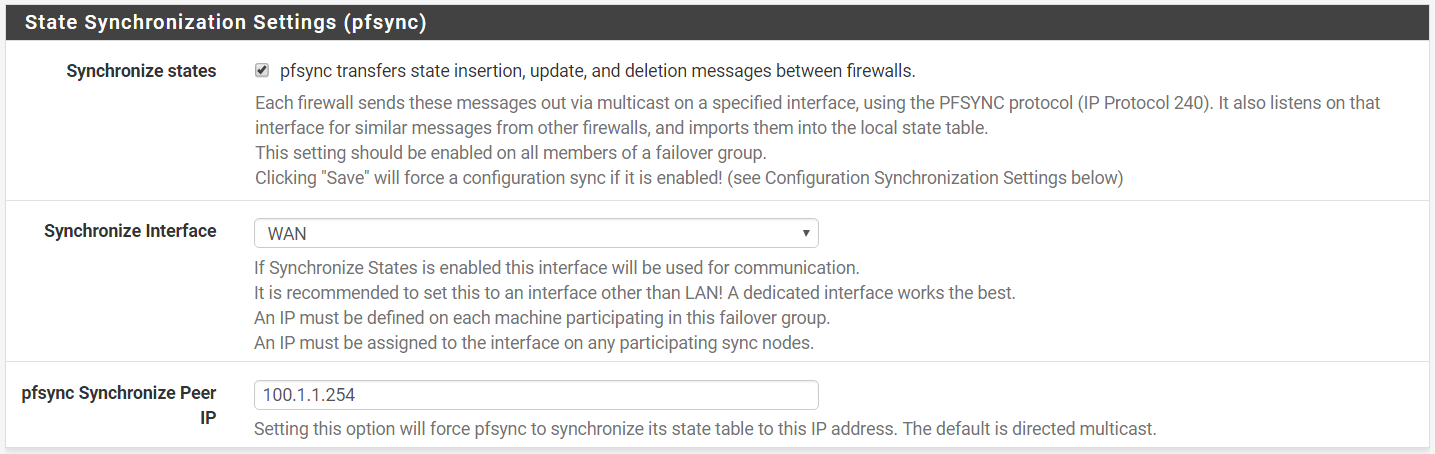
Step 13: Under the first section (State Synchronization Settings),
Synchronize states > checked
Synchronize Interface > SYNC
Pfsync Synchronize Peer IP > 200.1.1.254

Step 14: Synchronize Config to IP > 200.1.1.254
Step 15: Specify the Remote System Username and Password (slave firewall that its pointing to – use login credentials).
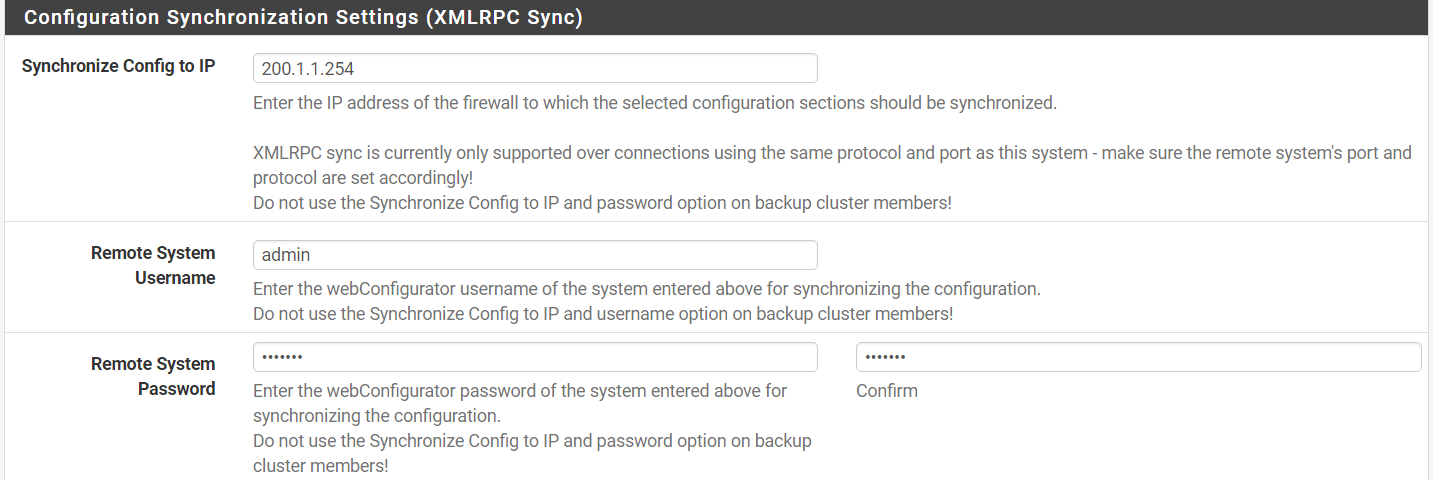
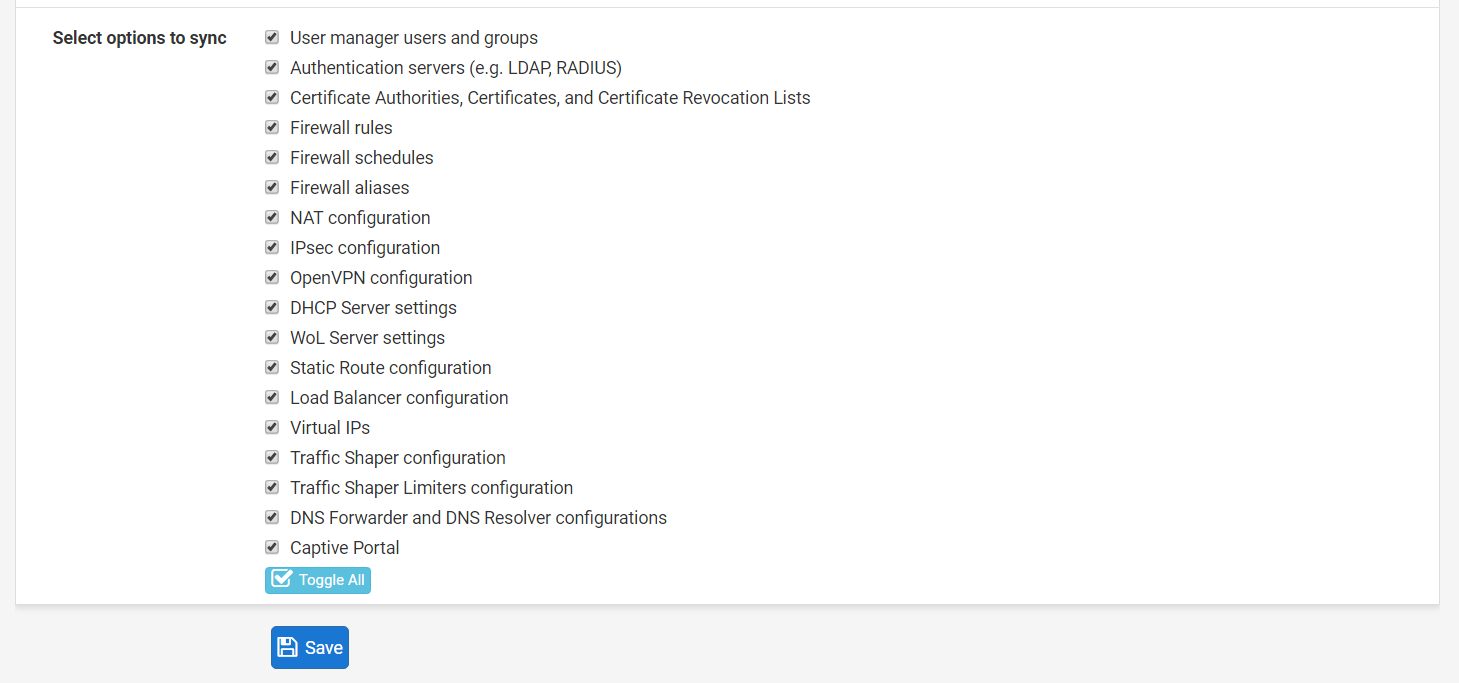
Step 16: Toggle All to select everything and click Save.
Step 17: On your slave firewall (pfSense02.localdomain), under State Synchronization Settings:-
Synchronize states > checked
Synchronize Interface > SYNC
Pfsync Synchronize Peer IP > 100.1.1.254
Step 18: Do not touch anything under Configuration Synchronization Settings!
Task 2: Test the Synchronization
Step 1: To test the synchronization, return to your Master Firewall and go to Firewall > Aliases.
Step 2: Create a dummy alias and apply changes
Step 3: The alias created should also appear on the slave firewall.

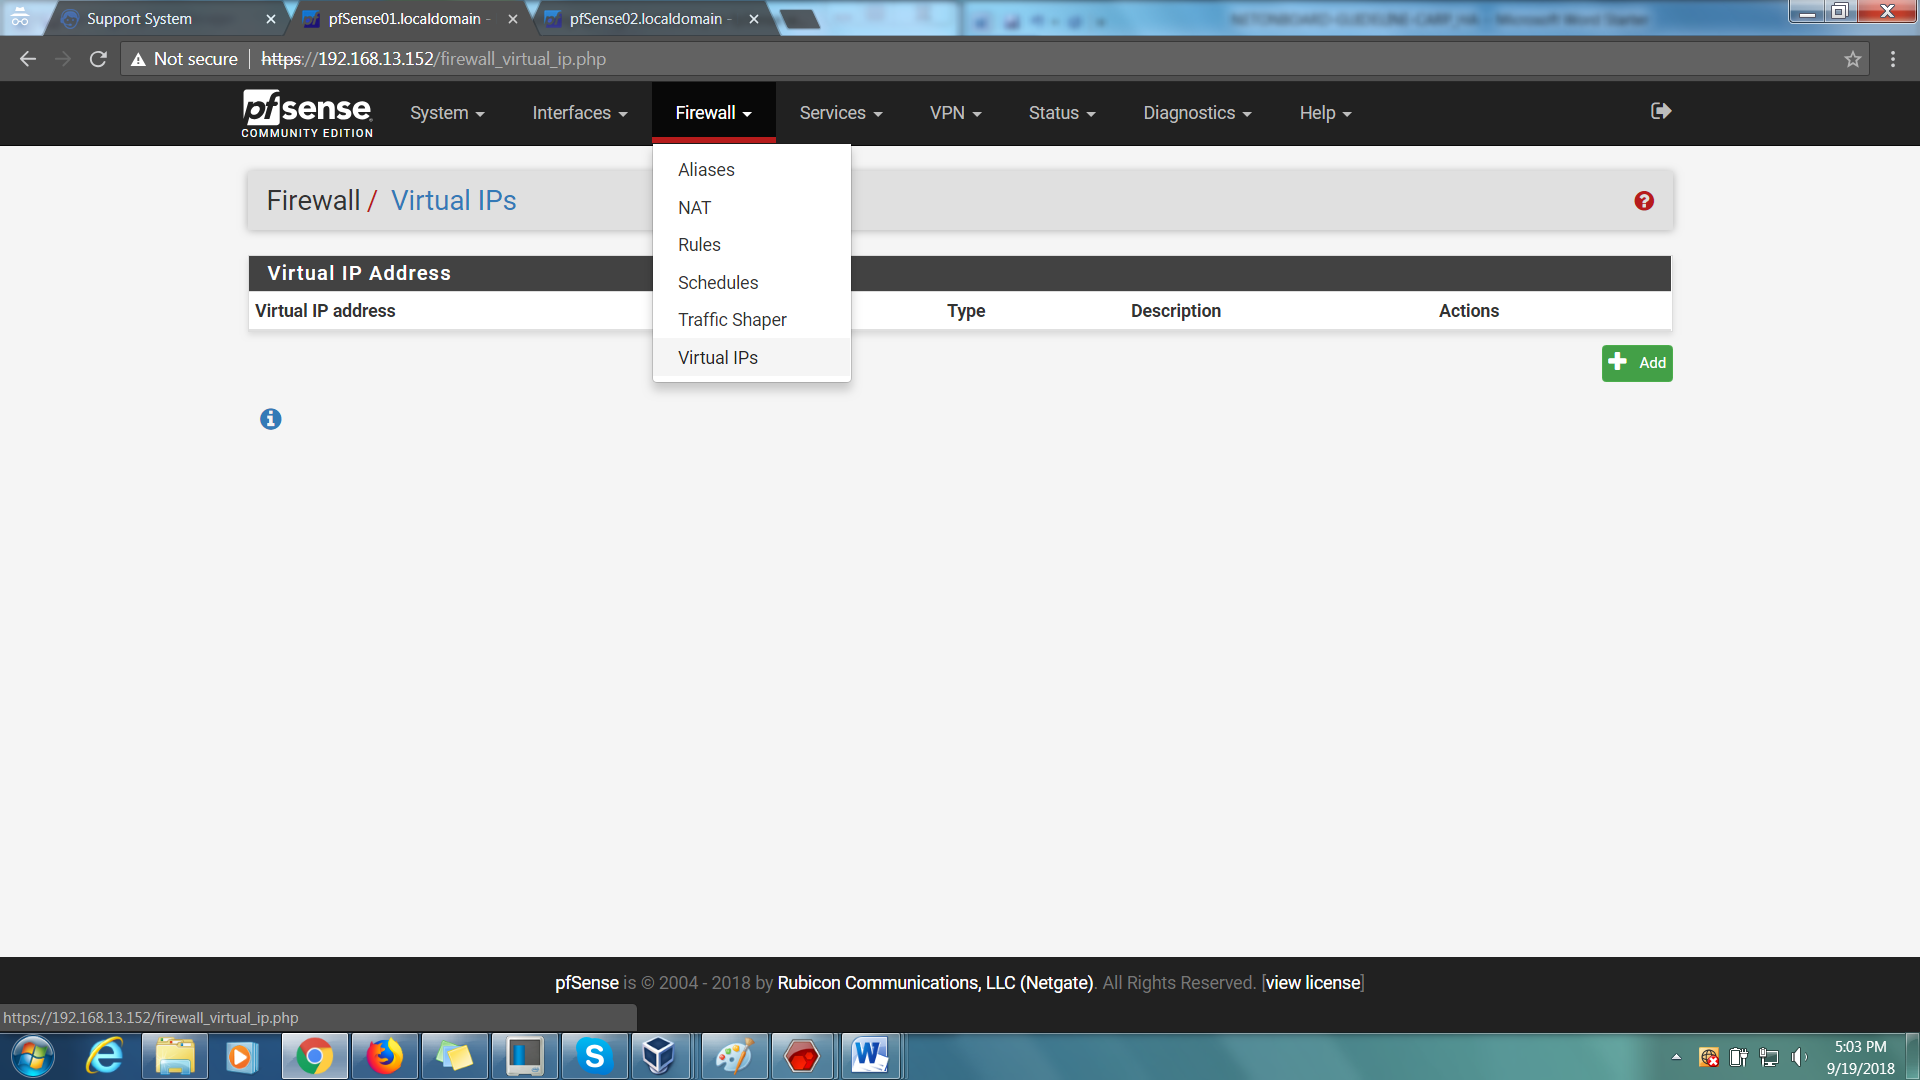
Task 3: Create Virtual IPs (CARP)
Step 1: On the master firewall, go to Firewall > Virtual IPs > Add
Step 2: Create 2 virtual IPs namely WAN VIP and LAN VIP.
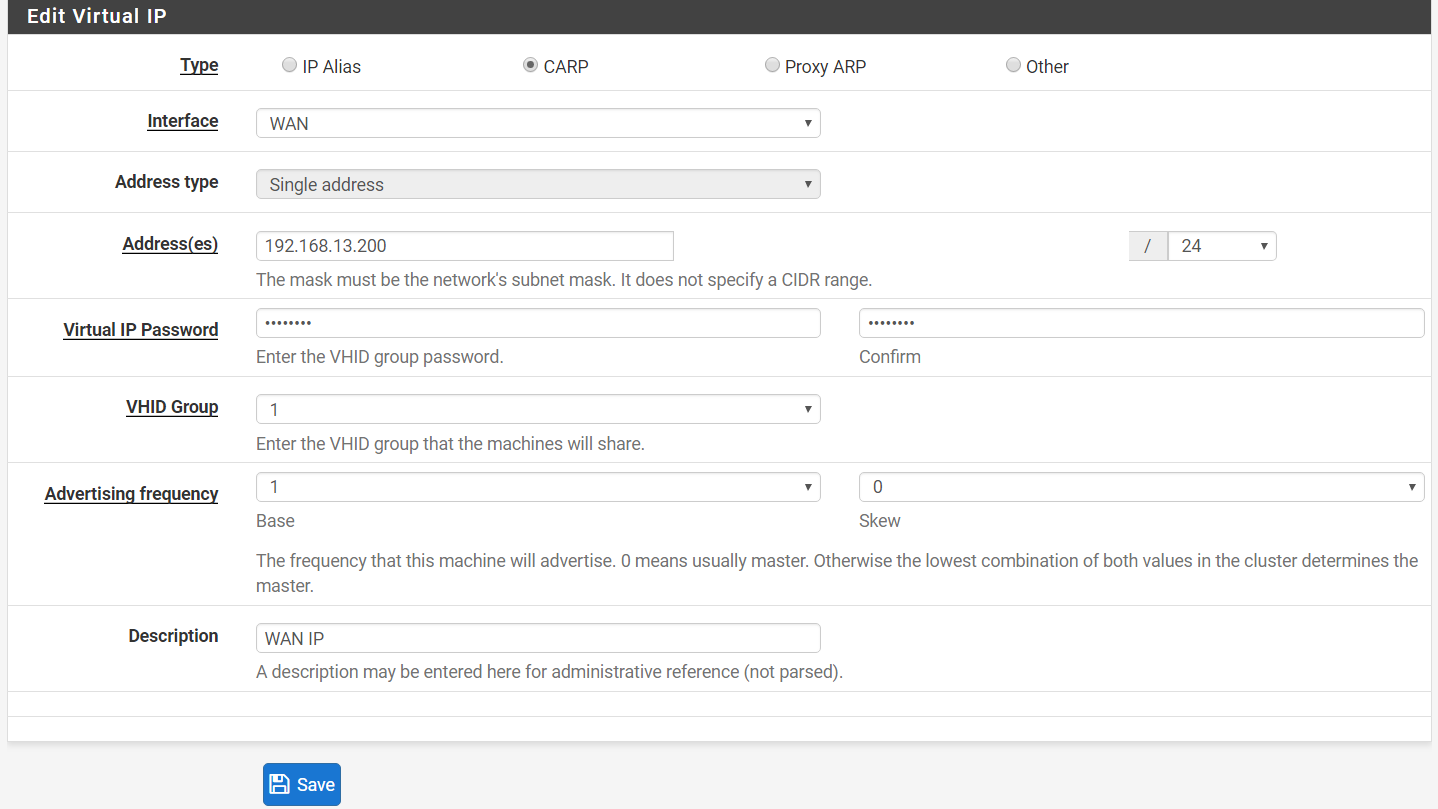
Step 3: WAN VIP:-
Type > CARP
Address > 192.168.13.200
Virtual Password > your password here
VHID Group > 1
Advertising frequency > 1
Skew > 0
Description > WAN VIP
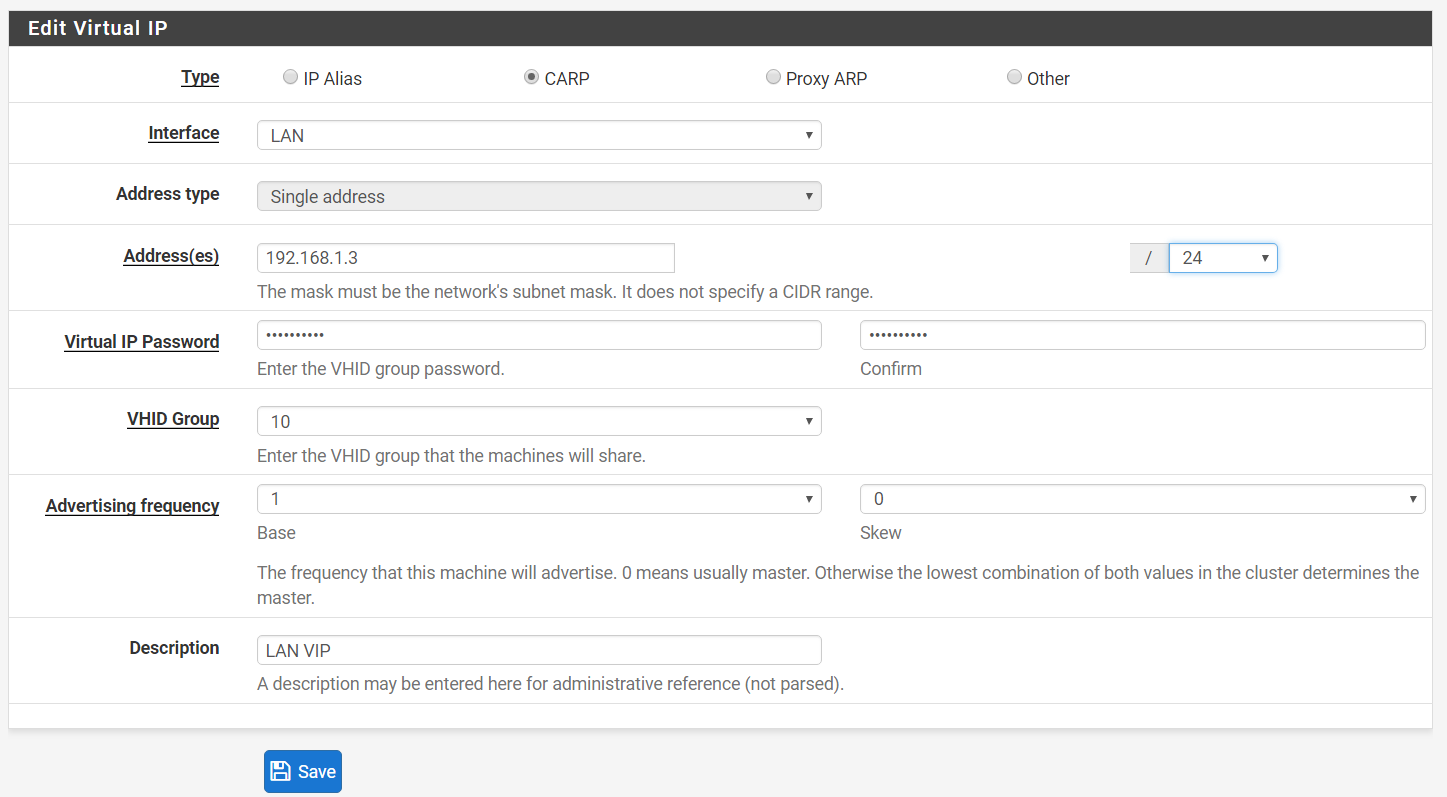
Step 4: LAN VIP:-
Type > CARP
Address > 192.168.1.3
Virtual Password > your password here
VHID Group > 10
Advertising frequency > 1
Skew > 0
Description > LAN VIP
Step 5: 2 VIPS will be automatically created on the slave firewall where the skew is 100.
Task 4: Change Outbound NAT.
Step 1: On your master firewall, go to Firewall > NAT > Outbound.
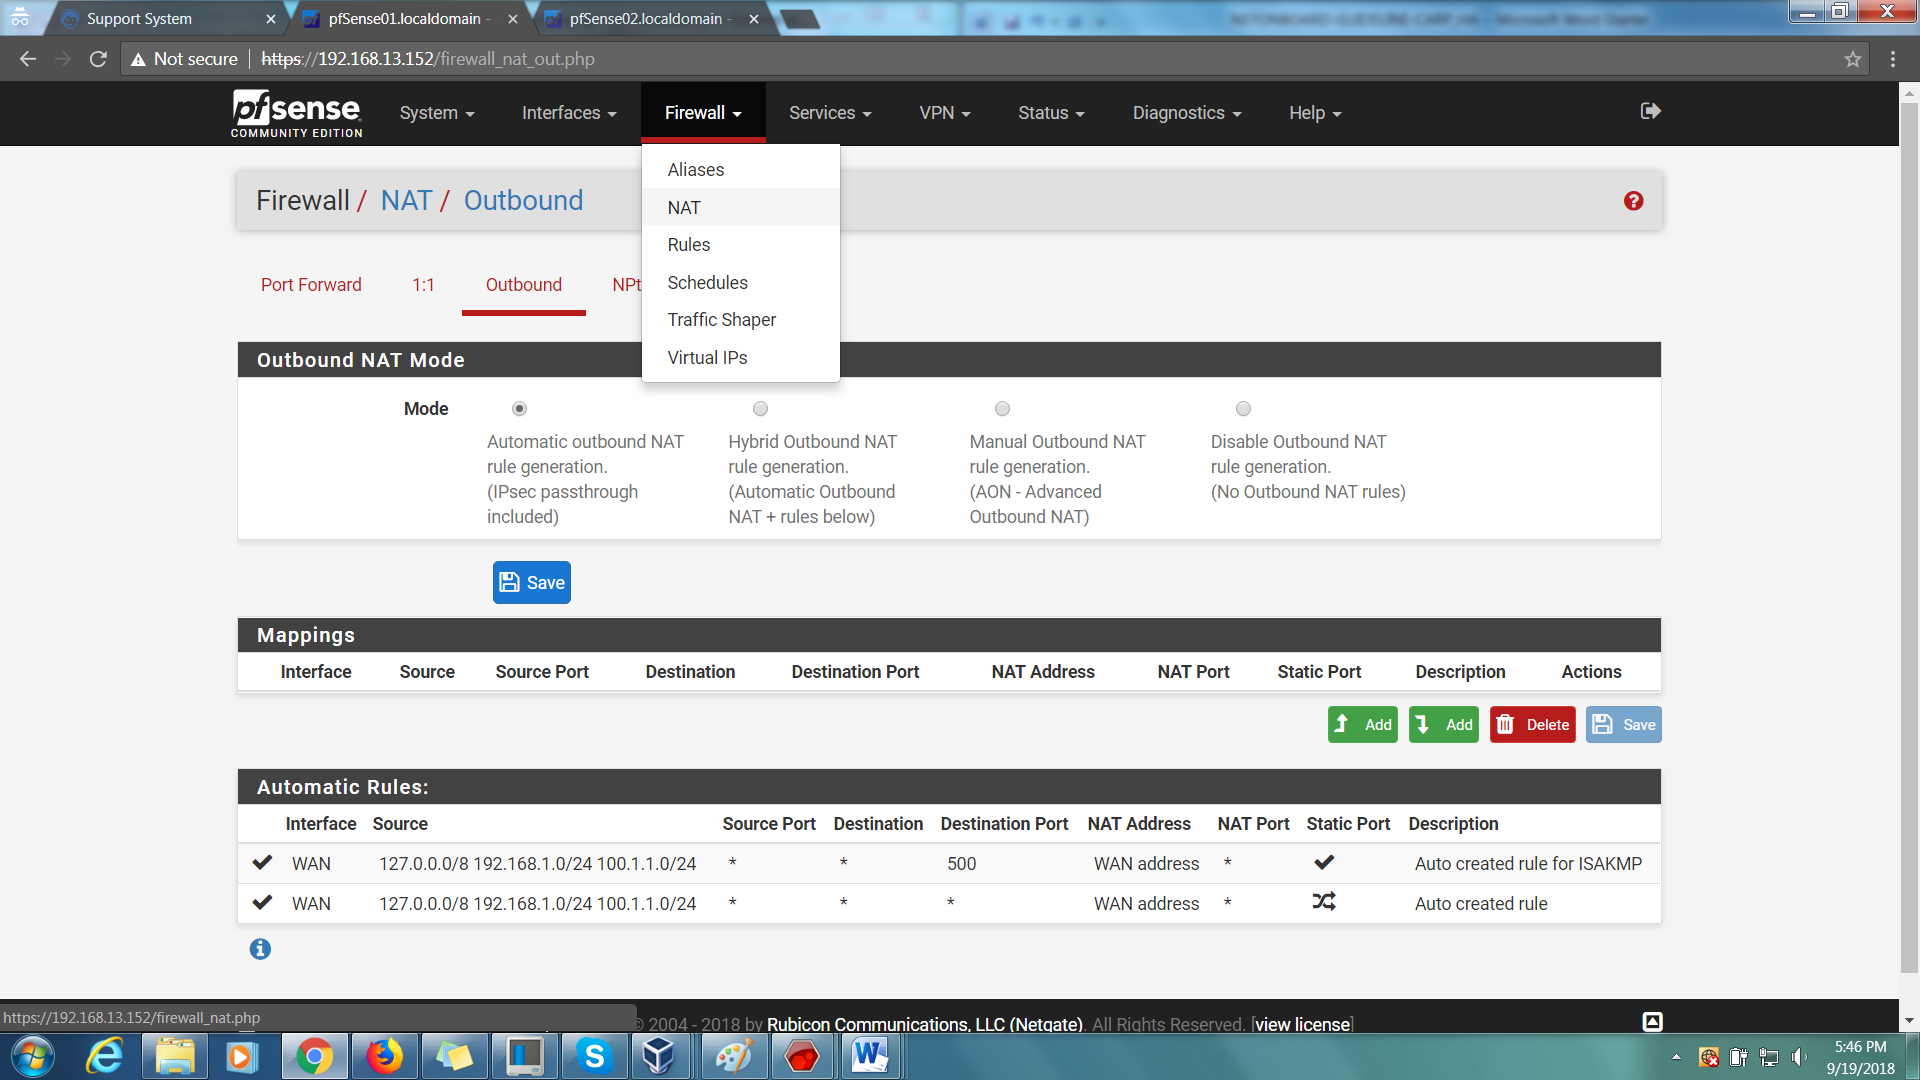
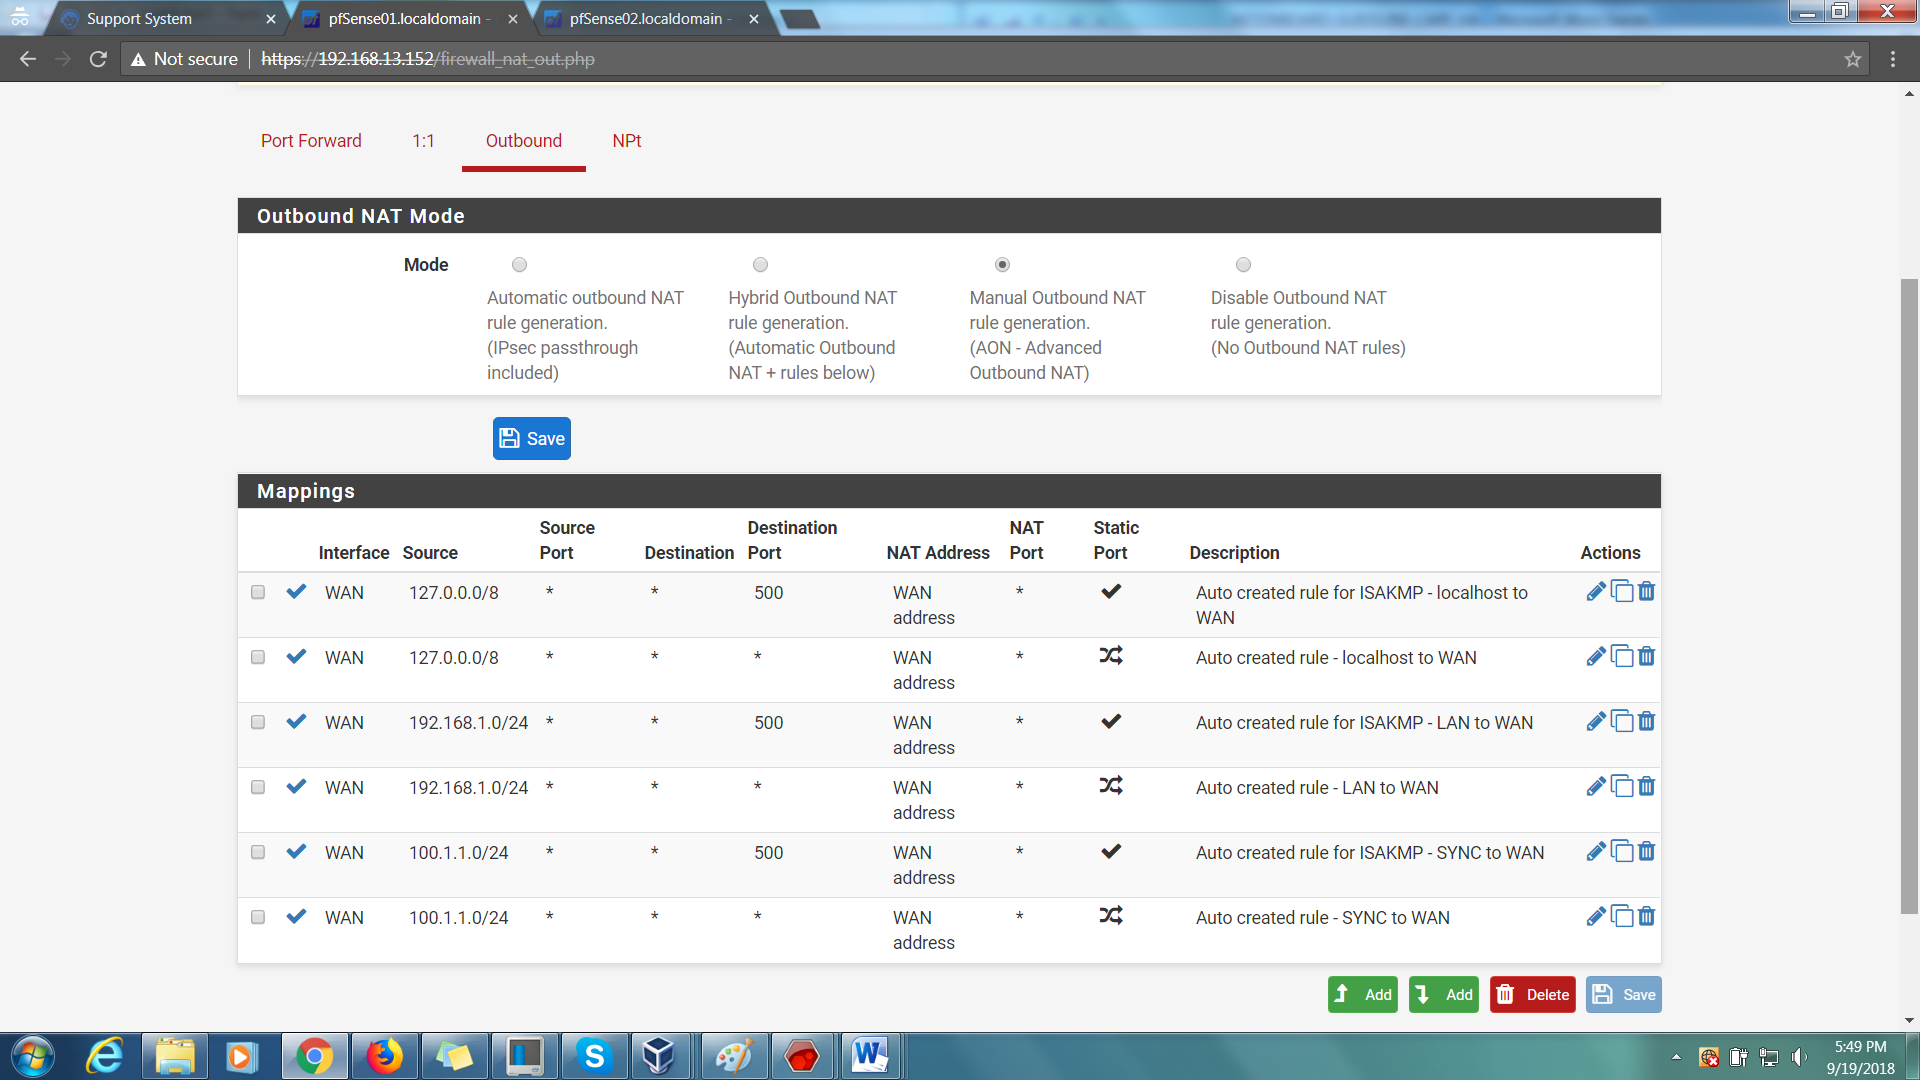
Step 2: Change the mode to ‘Manual Outbound NAT rule generation’, then Save.
Step 3: Find your IP ranges (There should be 2).
Step 4: Select either one, and change the Interface Address to WAN VIP address. Then save.
![]()
Step 5: Do the same thing for the other LAN IP ranges.

Step 6: The slave firewall should have these settings synchronized automatically.
Task 5: Setting DHCP and DNS
Step 1: Go to Services > DNS Resolver > General Settings
Step 2: Enable DNS resolver > checked
Step 3: Change the ‘Outgoing Network Interfaces’ to the WAN VIP. Click Save.
Step 4: Go to Services > DHCP Server > LAN.
Step 5: Under ‘DNS Server’, use the public DNS server addresses
208.67.222.222
8.8.8.8
Step 6: Click Save.
Task 6: Test the Configuration
Step 1: Go to Status > CARP (failover)
Step 2: At that moment, the statues on the first firewall are ‘MASTER’ while the second firewall are ‘BACKUP’.
Step 3: Click on ‘Enter Persistent CARP Maintenance Mode’.
Step 4: The statues are then switched between the firewall (failover).
Step 5: On your VM client, restart the network via ‘service network restart’.
Step 6: Perform a ping test (e.g: ping google.com). If successful, there is an outbound connection.