Objectives
Understand and utilize the basic commands of the RAID controller, storCLI.
Prerequisites
- Debian-based Server with RAID card supported.
Steps
Step 1: Install and Setup StorCLI
Launch the server console. You can access the console through either PuTTY / IKVM.
Before you begin, ensure your packages are updated by using the following command: –
apt-get update
Next, install the necessary dependent binaries needed for StorCLI.
apt-get install build-essential
Create a new directory called ‘downloads’.
mkdir -p /downloads
Navigate into the new directory via cd command.
cd /downloads
Obtain the StorCLI installer via wget.
wget http://www.netonboard.com/download/StorCLI.zip
Once the installer is downloaded, download the unzip package to extract the installer.
apt-get -y install unzip
Extract the installer into a new folder named ‘StorCLI’.
unzip StorCLI.zip -d StorCLI
Navigate into the new directory via cd command.
cd /downloads/StorCLI/Ubuntu/
Finally, install the debian-based StorCLI package.
dpkg -i storcli_1.09.08_all.deb
Step 2: View All Available Physical Disks
To view all available disks controlled by the RAID card, use the following command: –
/opt/MegaRAID/storcli/storcli64 /c0 /eall /sall show
Example Output: 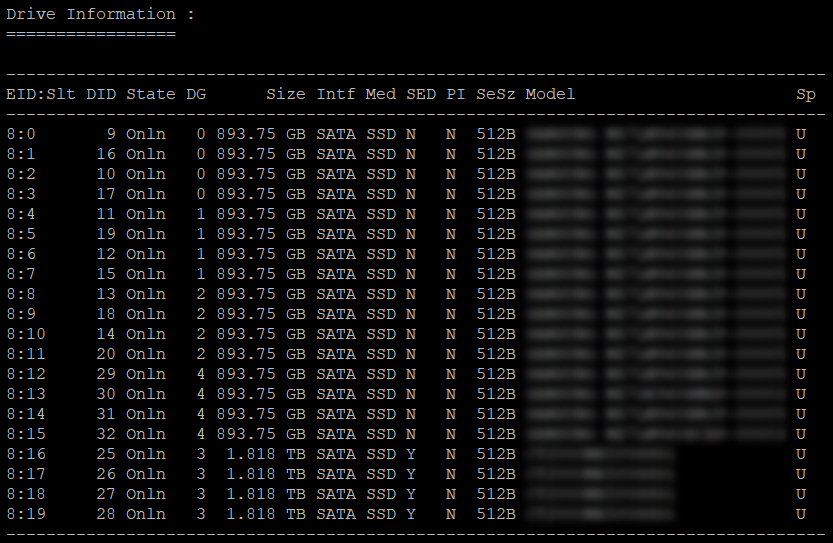
Step 3: View All Available Virtual Groups
To view all configured virtual groups within a RAID controller.
/opt/MegaRAID/storcli/storcli64 /c0 /vall show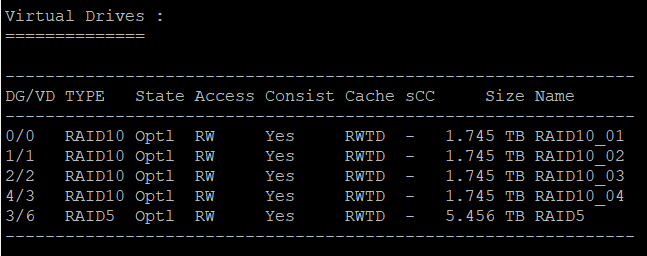
Step 4: Create Virtual Disk Groups
Virtual disks can be created by simply using the add vd command.
/opt/MegaRAID/storcli/storcli64 /c0 add vd type=(raid0/raid1/raid10) name=*RAID Group Name* drives=[EnclosureID:SlotID|:SlotID-SlotID|:SlotID,SlotID] pdperarray=x
For example, to create a Level 10 RAID Group: –
/opt/MegaRAID/storcli/storcli64 /c0 add vd type=raid10 name=RAID10_04 drives=8:12-15 pdperarray=2
type = Specify the RAID level
name = Specify the name of the RAID group
drives = Specify which physical disk will be part of the RAID group
pdperarray = Specify the number of physical drives per array
Step 5: Delete Foreign Disks
Some disks may have the ‘F’ indicator which means that the disk came from a previously configured RAID group in a different server. To delete any foreign drives, simply enter the following command: –
/opt/MegaRAID/storcli/storcli64 /c0 /fall delete /force
(NOTE: This command cannot be done on individual disks, this command affects on all foreign disks. Use this command with precaution)
Step 6: Fixing an Improperly Removed Disk
Sometimes disks may be recognized as UBAD (Unconfigured Bad) due to the disk being improperly removed and was reconnected to the RAID controller.
To fix this, change the state to UGOOD (Unconfigured Good).
/opt/MegaRAID/storcli/storcli64 /c0 /ex /sx set good
The RAID controller will then recognize the device as a foreign disk.
/opt/MegaRAID/storcli/storcli64 /c0 /fall show
Finally, add the foreign pool to be included in the configuration.
/opt/MegaRAID/storcli/storcli64 /cx /fall import
Other Useful Commands
1. Update the Firmware
/opt/MegaRAID/storcli/storcli64 /c0 download file=/path_to_firmware.rom
2. Display Information on the Controller
/opt/MegaRAID/storcli/storcli64 /c0 show all
3. Removing a Virtual Disk Group
/opt/MegaRAID/storcli/storcli64 /c0/vx del
4. Initializing a Virtual Disk Group
/opt/MegaRAID/storcli/storcli64 /c0/vx start init