Objectives
Create a new RAID disk group via command line using storcli and make it recognizable for Logical Volume Management (LVM).
Prerequisites
- storcli utility (Click Here to install the tool)
Steps
Step 1: Show All Physical Drives Stored Under RAID Controller.
Before we begin to initialize and create RAID disk groups, we would need to check and the necessary disk information using the following command: –
NOTE: Newly added physical disks will be under the status, UGOOD (Unconfigured Good)
/opt/MegaRAID/storcli/storcli64 /c0 /eall /sall show
Step 2: Delete Foreign Disks
Some disks may have the ‘F’ indicator which means that the disk came from a previously configured RAID group in a different server. To delete any foreign drives, simply enter the following command: –
/opt/MegaRAID/storcli/storcli64 /c0 /fall delete
Step 3: Add a Virtual Disk Group
Now, add the disks into a single virtual disk group via the add vd command. In this case, we will setup a RAID Level 10 disk group with RAID10_04 as the name with 2 physical disks per array.
/opt/MegaRAID/storcli/storcli64 /c0 add vd type=raid10 name=RAID10_04 drives=8:12-15 pdperarray=2
type = Specify the RAID level
name = Specify the name of the RAID group
drives = Specify which physical disk will be part of the RAID group
pdperarray = Specify the number of physical drives per array
Step 4: List All Available Disks
We have initialized the RAID disk group via storcli, we should be able to see the newly added disk via lsblk.
Step 5: Create Partition
Now, let us create a new partition on our newly-initialized disk.
parted /dev/sdX
– Directs you to the GNU Parted shell (X – may vary depending on the number of disks / blocks you have in your server)
mklabel gpt
– Sets gpt (GUID Partition Table) as the main partitioning table structure.
unit TB (Optional)
– Specifies the unit size that would be displayed on your disk.
mkpart primary 0 100%
– Takes the entire disk space as the primary partition.
set 1 lvm on
– Sets lvm as the flag on the partition.
print
– Displays the current information of the partition.
quit
– Exits the shell.
Step 6: Create New Disk Volume
Now, let us create a new disk volume which shall be recognizable for LVM.
pvcreate /dev/sdX1
You can view or verify the configuration of the disk volume using the following command.
pvdisplay
Step 7: Create New Volume Group
Next, we will need to create a new volume group on PhysicalVolume, this group will be viewable from your hypervisor.
vgcreate SSD_960GB_04_RAID10_04 /dev/sdX1
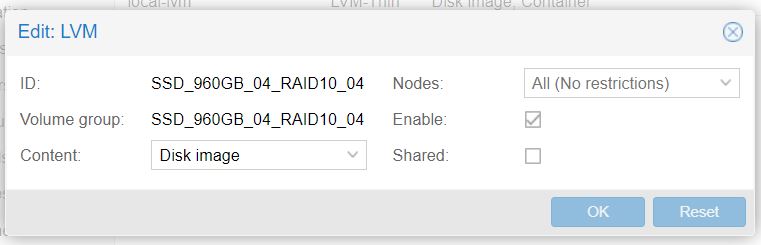
Step 8: Create LVM
At your hypervisor, simply at the new volume group.