Objective
Perform Bare Metal Restore on R1Soft Backup Manager to restore a server to a previous backup state into an alternate host.
Prerequisites
- R1Soft Manager set up on Proxmox (available here)
- At least 1 backup of the server you want to restore in R1Soft Manager
Steps
Step 1: Download the Live ISO
Navigate to the R1Soft Repository and download the corresponding ISO based on the OS of the server you want to restore.
For Windows: serverbackup-bootcd-agent.iso or direct link here
For Linux: serverbackup-centos-bootcd-agent.iso or direct link here
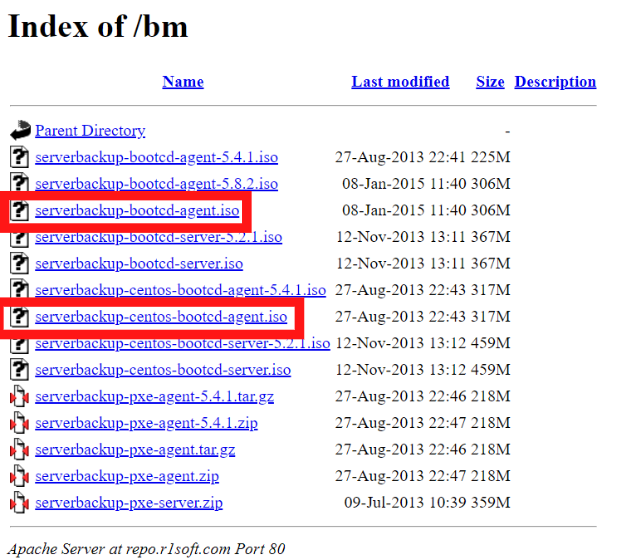
After that, upload the ISO to your Proxmox ISO storage.
Step 2: Check Server Hard Disk Size
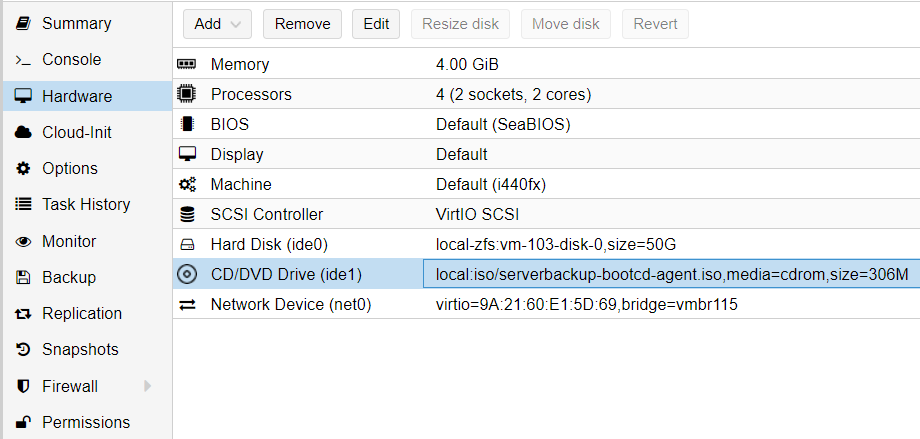
In the Proxmox Web GUI, navigate to the server you want to restore and navigate to Hardware.
Next, determine the size of your hard disk by checking the Size tag on your Hard Disk, shown by the following figure.
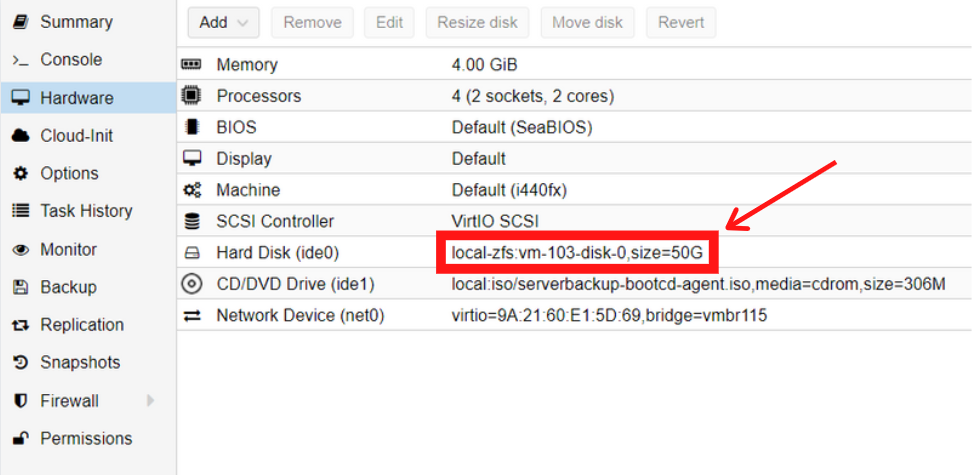
As seen from the example above, the size of the hard disk is 50GB. Take note of this number as it will be used in the next step.
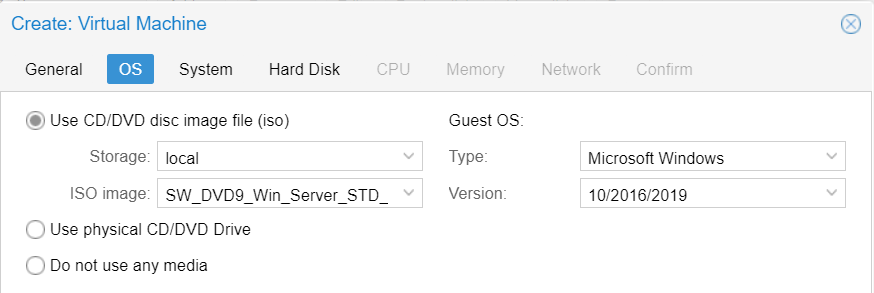
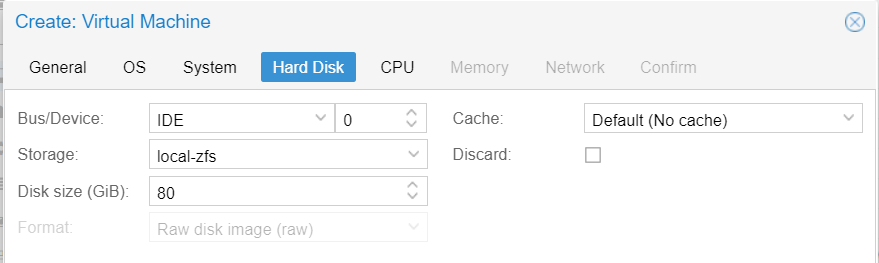
Step 3: Create Backup Server VM
Create a new VM in Proxmox.
After that, in the OS section, make sure to select the same OS and ISO as the one in the original server.
Next, in the Hard Disk section, make sure that the size that you have created is equal to or larger than the size of the original server.
Afterwards, proceed to start the VM and finish the installation of the corresponding OS along with the matching partitions.
Step 4: Configure and Boot the Live ISO
DO THIS ON THE BACKUP SERVER
Navigate to Your Server > Hardware > CD/DVD Drive and load the suitable Live ISO.
Afterwards, boot your machine into the Live ISO by changing the boot order in Options.
Then, set CD-ROM as Boot Device 1 and leave the rest as it is.
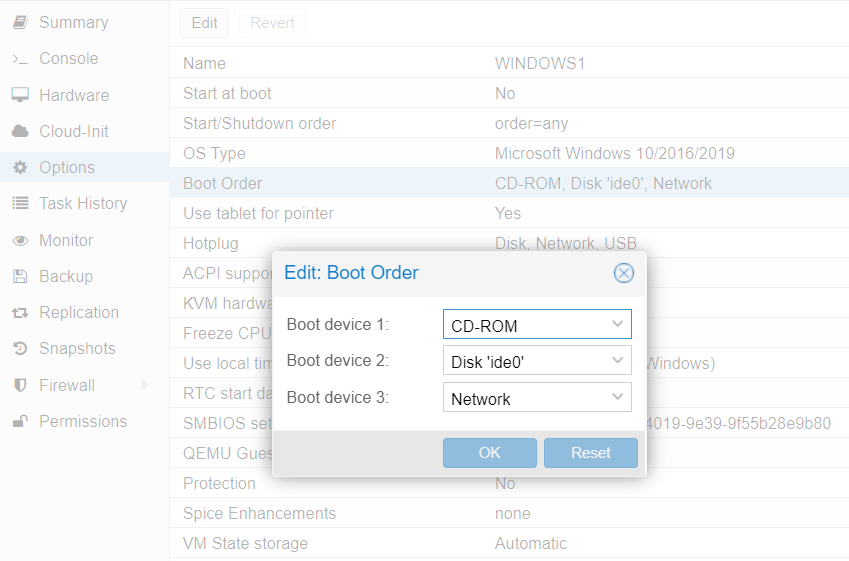
Finally, start your VM and it will automatically boot into the Live ISO.
Step 5: Configure Live ISO VM
DO THIS ON THE BACKUP SERVER
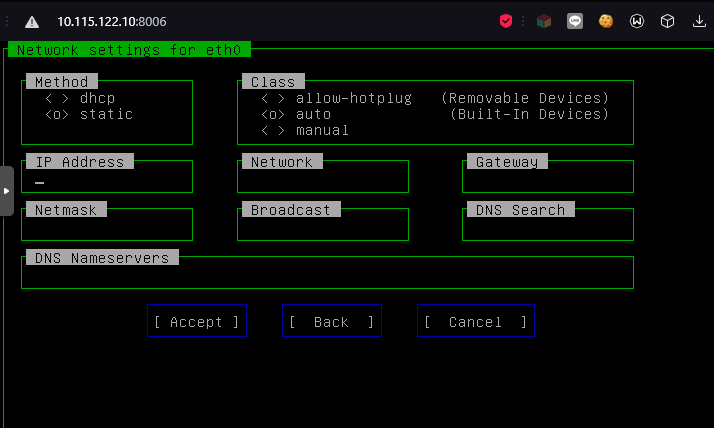
Use either of the following commands to configure the IP address for the VM.
sudo ceni (Windows ISO)
system-network-config (Linux ISO)
Then, select the interface you want to configure. Navigate the interface by using Tab and arrow keys.
Set the Method to Static or Manual, then configure the IP address.
Next, when you have logged into the command shell, restart the networking service by using either of the following commands.
sudo service networking restart (Windows ISO)
service network restart (Linux ISO)
Afterwards, you can verify the connectivity of the machine by pinging to the Default Gateway IP Address.
Then, start the CDP Agent service on the machine using either of the following commands.
sudo service cdp-agent start (Windows ISO)
service cdp-agent start (Linux ISO)
Note that you have to set the IP address to match the one that has been set on the original server on the R1Soft Manager.
On the other hand, you can use any free IP address for the Backup Server.
Step 6: Perform Bare Metal Restore
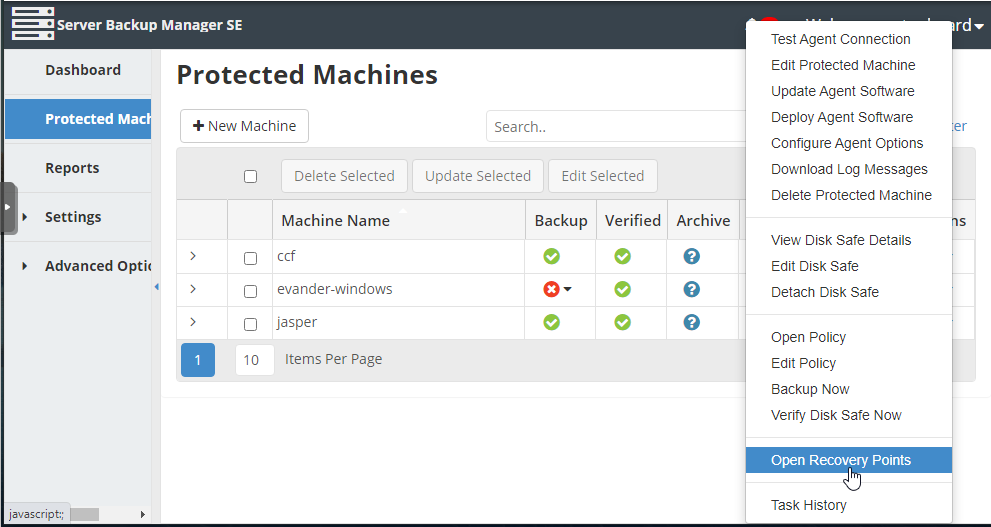
Login to your R1Soft Backup Manager Web GUI. Then, navigate to Protected Machines.
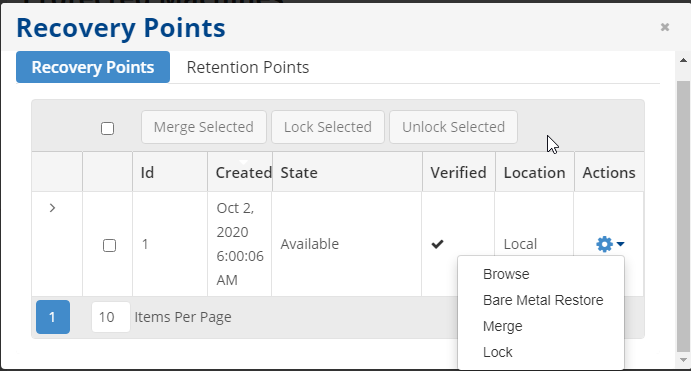
Next, select the server you want to perform the bare metal restore on and click the gear icon on the right side and select Open Recovery Points.
Afterwards, select the Recovery Point that you want to restore to and click the gear icon on the right side and select Bare Metal Restore.
Next, select the Filesystems you want to restore and click Next. By default, R1Soft will restore all filesystems.

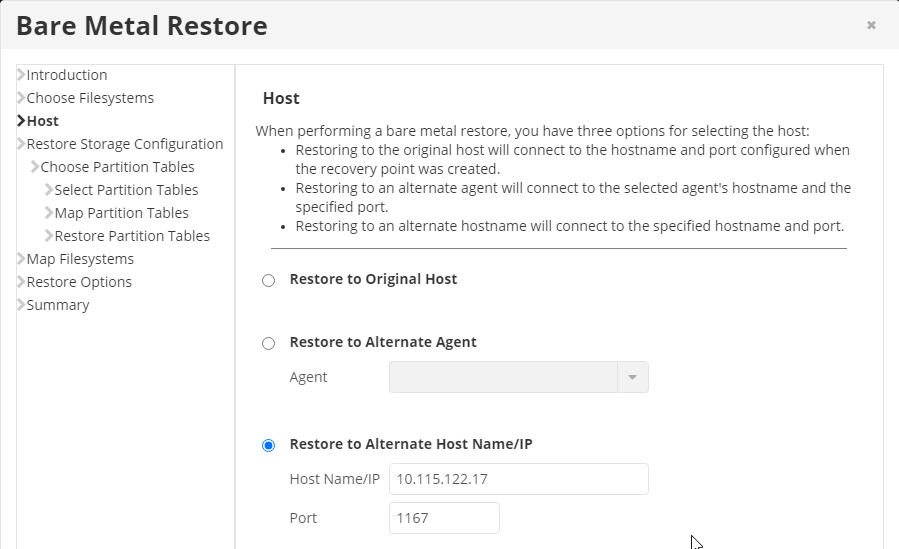
Then, in the Host configuration, select Restore to Alternate Host Name/IP and enter the IP address of the backup server you have just configured.
Next, under Restore Storage Configuration, choose the Select Storage Configuration to Restore option and press Next.
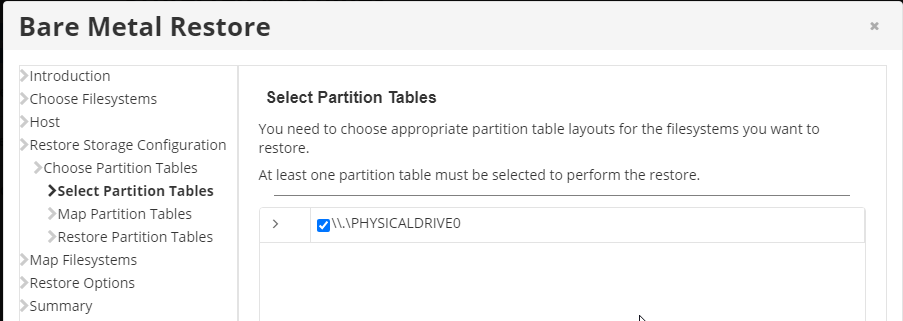
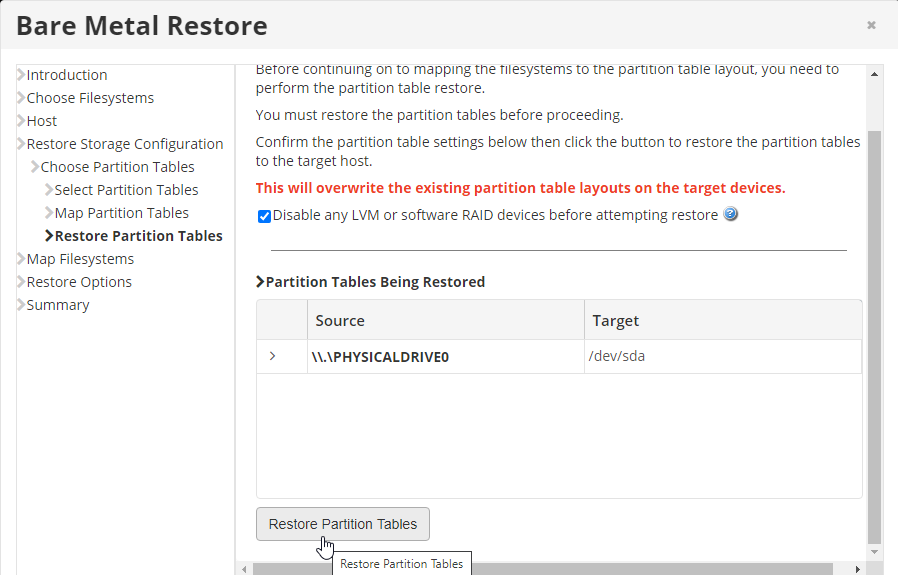
Afterwards, under Choose Partition Tables, choose Select Partition Tables to Restore.
Then, select the partition table(s) you wish to restore.
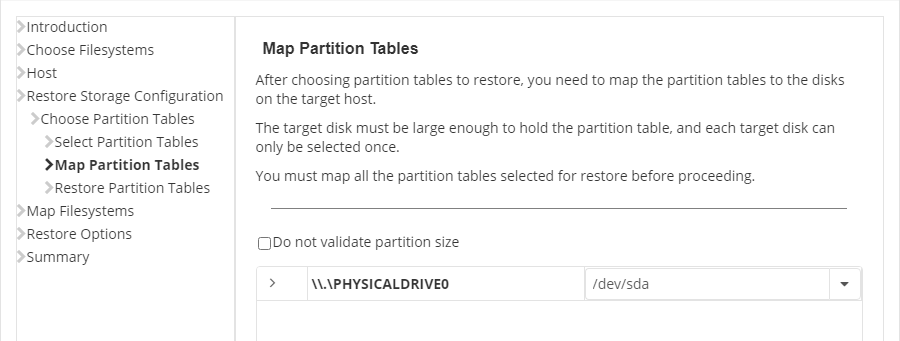
Next, map the partition table(s) according to their appropriate size.
Afterwards, confirm everything and click on Restore Partition Tables.
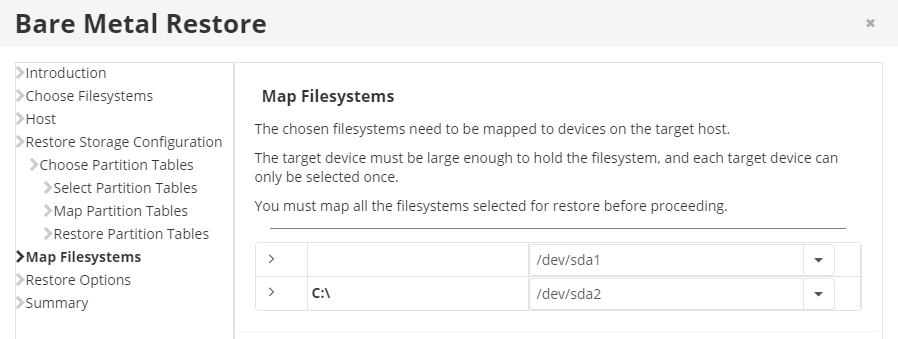
If the restoration is successful, you will be prompted to map the filesystems. Map them according to your existing configuration and with the correct size.
Next, you can choose whether to reboot after restore or to check filesystems after restore under the Restore Options.
After you have verified your settings, click on Restore. The restore process will take some time according to your server size.