Objective
Setting up Firewalld in CentOS 7 and providing further explanation on its commands.
Prerequisites
- A Linux-based operating machine (Preferably RPM-based distros)
Steps
Step 1: Set Up firewalld
Install firewalld on your machine using the following commands.
yum install firewalld
systemctl enable firewalld
reboot
You can enable or disable the firewalld service using the following command. Enabling firewalld means that the firewalld service will automatically start at boot.
systemctl enable firewalld
systemctl disable firewalld
Next, you can start, stop, or restart the firewalld service using the following commands.
systemctl start firewalld
systemctl stop firewalld
systemctl restart firewalld
Then, you can also check the status of the firewalld service to verify that it is running by using one of the following commands.
systemctl status firewalld
firewall-cmd --state

Step 2: Add a New Zone
You can create own zone and reload firewall to bring into active configuration by using the following commands.
firewall-cmd --permanent --new-zone=privateDNS
firewall-cmd --reload
firewall-cmd --get-zones
Then, apply the rules listed before such as add service and change interface. After applying permanently, restart network and reload firewall service with the following commands.
systemctl restart network
systemctl reload firewalld
Step 3: Manage and Configure Zones
You can list out the available zones using the following command.
firewall-cmd --get-zones

Verify the rules associated with certain zones or all available zones with the following commands.
firewall-cmd --zone=public --list-all
OR
firewall-cmd --list-all-zones | less
You should change the zone of an interface, or else interface will be put in the default zone when the firewall is booted using the commands below.
firewall-cmd --zone=home --change-interface=eth0
firewall-cmd --get-active-zones

Adjust the default zone for easier configuration by using the following command.
firewall-cmd --set-default-zone=home
To make sure a rule is saved even after you restart firewalld, or reboot the server, include the –permanent flag.
Step 4: Manage Traffic and Services
Use the following commands to manage traffic for incoming port for UDP or TCP in specific zone. You can either add or remove a port by using the corresponding commands.
firewall-cmd --permanent --zone=home --add-port=[YOUR PORT or PORT RANGE]/TCP
firewall-cmd --permanent --zone=home --add-port=[YOUR PORT or PORT RANGE]/UDP

firewall-cmd --permanent --zone=home --remove-port=[YOUR PORT or PORT RANGE]/TCP
firewall-cmd --permanent --zone=home --remove-port=[YOUR PORT or PORT RANGE]/UDP
To verify the addition or removal of ports, run the following command.
sudo firewall-cmd --zone=home --list-ports
Use the following command to add or remove a specific service in your firewall zone.
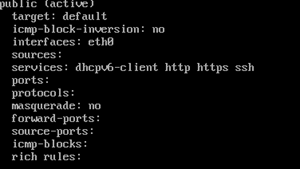
firewall-cmd --permanent --zone=public --add-service=ssh
firewall-cmd --permanent --zone=public --add-service=http

firewall-cmd --permanent --zone=public --remove-service=https
To verify the addition or removal of services, run the following command.
firewall-cmd --zone=public --list-services
Add or remove ICMP types in a specific zone by using the following commands.
firewall-cmd --zone=public --add-icmp-block=echo-request

firewall-cmd --zone=public --remove-icmp-block=echo-request
Verify the modification by running the command below.
firewall-cmd --zone=public --list-icmp-blocks
You can also display the available ICMP types by using the following commands.
firewall-cmd --get-icmptypes
Step 5: Manage IP Address Whitelist
Use the following command to whitelist an IP address.
firewall-cmd --permanent --add-source=192.168.1.100
You can also allow a range of IP addresses using CIDR notation using the command below.
firewall-cmd --permanent --add-source=192.168.1.0/24
Use the following command to remove the IP address from the whitelist.
firewall-cmd --permanent --remove-source=192.168.1.100
Step 6: Manage Rich Rules
You can disallow or block IP addresses using the following command.
firewall-cmd --permanent --add-rich-rule="rule family='ipv4' source address='192.168.1.100' reject"
Whitelist an IP Address or IP range for a specific port by running the following command.
firewall-cmd --permanent --add-rich-rule='rule family="ipv4" source address="192.168.1.100" port protocol="tcp" port="3306" accept'
OR
firewall-cmd --permanent --add-rich-rule='rule family="ipv4" source address="192.168.1.0/24" port protocol="tcp" port="3306" accept'
Use the following command to remove rich rules.
firewall-cmd --permanent --remove-rich-rule='rule family="ipv4" source address="192.168.1.100" port protocol="tcp" port="3306" accept'
Reload the firewall to apply the updated rules by running the following command.
firewall-cmd reload
View the current firewall rules by using the following command.
firewall-cmd --zone=public --list-all
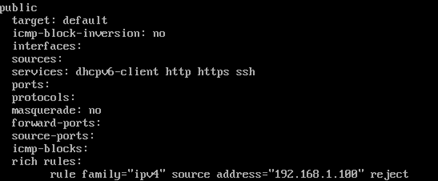
As seen from the figure above, the IP address 192.168.1.100 has been rejected. We can verify the rule by pinging the address, and it would not be able to ping.

Step 7: Manage Outbound Ports
Verify the outbound ports accept/reject list by using the following command.
firewall-cmd --direct --get-all-rules

You can add an outbound port accept rule for port 80 by using the following command.
firewall-cmd --permanent --direct --add-rule ipv4 filter OUTPUT 0 -p tcp -m tcp --dport=80 -j ACCEPT
Similarly, you can also remove the port by using this command.
firewall-cmd --permanent --direct --remove-rule ipv4 filter OUTPUT 0 -p tcp -m tcp --dport=80 -j ACCEPT
Step 8: Store Configuration Backup
To store the current configuration into files, run the following commands.
iptables -S > firewalld_rules_ipv4
iptables -S > firewalld_rules_ipv6